Page 2 of 4 FirstFirst 1 2 3 4 LastLast
Results 16 to 30 of 49

Thread: Tone popper with OEM Tailgate Popper button

  1. #16
    Member Since
    Apr 2004
    Location
    2000, Ebony, VX, 0370
    Posts
    2,503
    Thanked: 12
    Quote Originally Posted by JAMAS View Post
    Hmmm... That's odd. I would think it was just a ground. If anything I would think the door indicator on the switch would light up if Any door opened.
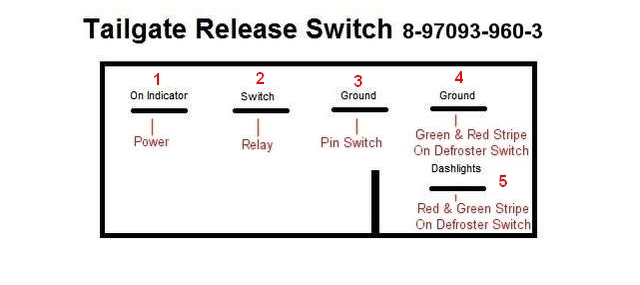
    Yes, if you wire the popper per Tone's instructions you do tap into a wire in the passenger side door sill from the pin switch that you install. I believe that wire is the one that turns the dome light on when the passenger door is open. This allows the dome light to come on when the rear door is open too. I can't quite remember how it's wired, but because of this the little indicator light on the factory switch does come on no matter what door is open, and since that happens the switch cancels itself out and doesn't allow you to pop the rear door open. So if you open your drivers side door to hit the tail gate release switch it won't activate the popper because the indicator light on the switch will be on due to the fact that your drivers side door is open. I had to disconnect the wire that I had run from the pin switch to the indicator light in order to get the switch to activate the popper when any of the doors were open. I have yet to install a second, dedicated, pin switch to wire to the indicator light to get it to work if the rear door is open.
    "The major difference between a thing that might go wrong and a thing that cannot possibly go wrong is that when a thing that cannot possibly go wrong goes wrong, it usually turns out to be impossible to get at or repair."
    -Douglas Adams, Mostly Harmless

  2. #17
    Member Since
    Jan 2009
    Location
    1999, Ebony Black, VX, 1614
    Posts
    1,852
    Thanked: 1
    Quote Originally Posted by MSHardeman View Post
    So if you open your drivers side door to hit the tail gate release switch it won't activate the popper because the indicator light on the switch will be on due to the fact that your drivers side door is open.
    That makes sense. Guess I would need 2 pins...or figure something else out.

  3. #18
    Member Since
    Jul 2003
    Location
    2001,Ebony,VehiCROSS,1092
    Posts
    753
    Thanked: 0
    "If you're not living on the edge --- you're taking up too much space!!"

  4. #19
    Member Since
    Apr 2004
    Location
    2000, Ebony, VX, 0370
    Posts
    2,503
    Thanked: 12
    I DID try this Raque...... but I think I wired it wrong. Kept draining my battery so I think I tapped into a wrong circuit feeding the new relay. Haven't gotten in to try and re-wire it, but I will soon. Got the two doors to both unlock at the first push of the remote button, now just need to get the rear door to release on the second push. Thanks for taking the time to do a write up on this Raque.

  5. #20
    Member Since
    May 2002
    Location
    2000, Proton Yellow, VX, 0584
    Posts
    2,584
    Thanked: 10
    This was done for JAMAS and is subject to change very soon.
    After installing my door popper, I was always worried about the accidental "POP!" I moved my switch to a remote area (the lower switch place on the right side of the dash) but I was still worried that I'd be hitting that thing while moving and all my camping crap would end up all over the road being me. I came up with a simple solution whereas the switch would only activate if the VX was in park. I know it's a little extreme but here it goes.
    First, you need to have a plan for your switch and popper install. There are lots of (different) instructions for that so, I'm not covering that here. Additional to having the dash apart for the switch install you need to get access to the center console.
    After removing the center armrest console, take off the console cover to the transmission area. I did not include pics for that because it's pretty easy to do. Just remember the two screws that hold the A/T gear selector handle and be careful when taking it off as the thumb button and spring inside like to go flying when the handle grip come off.
    Once the transmission levers are exposed, you will see a little switch on the right side of the A/T handle. I took off the PRNDL indicator panel for my pics, you don't have to but it makes for better access. (When taking it off, you will get held up by the mini light that is attached. Just twist the lamp for it to come out of the socket for the whole panel to release)
    The switch will be/should be marked SS-5GL13-3 and will have two green wires attached to it (Mine has two red wires) as in the photo.

    PLEASE READ ALL BEFORE DOING!

    My current set up is as follows;

    1. Run a wire from your popper switch (OEM switch terminal #2 going to relay) to the interlock switch area, then to the relay (The interlock is going to interrupt the circuit between the switch and the relay) .


    2. Cut the green wires from switch and tie them together or you lose the brake interlock for the A/T


    3. At the interlock switch area, cut the wire you just ran from the switch to the relay. Connect the two wire ends to the 5GL13-3 switch (One on each terminal)


    PROBLEM - This works but every time you hit the brake pedal, the brake interlock solenoid with active causing a click. Drives me crazy!

    My new way of doing is as follows;

    1. Buy new switch. The switch can be purchased here;
    http://us.element14.com/omron-electr...pdt/dp/36K3563
    (I'm waiting for mine to come in as I just ordered it)

    2. Buy two screws "" mm X ""mm long I don't have them as I don't have my switch yet so I can't state a size yet.

    3. DO everything as above except for step two , leave the OEM switch as is.

    4. Take the two original screws out of the switch.

    5. Stack the new switch on top of the old one.

    6. Put in the longer screws.

    7. Attach the ends of the wire you ran from the switch.

    8. TEST!

    9. If all works, put everything back together, don't forget to put the mini bulb back in the A/T indicator!

    As soon as I get the parts, I'll post up the pics as they should be.
    Scott / moncha.com

  6. #21
    Member Since
    Jan 2009
    Location
    1999, Ebony Black, VX, 1614
    Posts
    1,852
    Thanked: 1
    If the OEM interlock switch has an output voltage and not just a ground, then cant we just run the "hot or not" side to the popper button port #1. If the park position switch is in park, then it would output voltage to the "hot or not" side of the wire, thus providing power to the popper button, thus providing power to the relay ...and so on and so on......thusly.

  7. #22
    Member Since
    Jan 2009
    Location
    1999, Ebony Black, VX, 1614
    Posts
    1,852
    Thanked: 1
    If not, can't we just join up with the green wires instead of a whole new switch?

    I guess I dont understand why it has to be one or the other connected to the park position switch.

  8. #23
    Member Since
    May 2002
    Location
    2000, Proton Yellow, VX, 0584
    Posts
    2,584
    Thanked: 10
    Its been a while and 12 strokes since I've been into this switch but, #1 and #2 make the circuit for the relay of the popper. I do not have that power source running through a switched source (Key on) so it is always hot.

    When I tried to just connect to the green wires I had unfavorable results. Either the A/T solenoid was always on which made the interlock for the brake not function or it didn't work at all. I simply can't remember.

    I'd have to go back in and redo the whole thing, which I am going to do and I'm going to take extensive notes when I do. I just need the parts so I don't have to take the thing apart again if I choose to do it with the second switch. On the other hand, I really want to do it with the second switch as I'm not comfortable screwing with a OEM safety feature more than I have already. I know it doesn't help you for your quest this weekend and it's my fault for not taking notes...

  9. #24
    Member Since
    Jan 2009
    Location
    1999, Ebony Black, VX, 1614
    Posts
    1,852
    Thanked: 1
    Any help you provide is GREATLY appreciated. I dont think its your responsibility to take notes for me.

    I might do a little more investigating this weekend, then maybe do the work the following weekend. I dont have time/energy/desire to do any work on the vx during the week when I havent seen my boy all day. Thats really the only reason I "schedule" vx days.

    I am going to get the volt meter out and see whats what. If there is voltage sent through when connected, or if its a ground. Either way, I may be able to tap into it how it is right now.

    This is a fun project already. I appreciate all the help, and I will be sure to document all of my findings/results.

  10. #25
    Member Since
    Jan 2009
    Location
    1999, Ebony Black, VX, 1614
    Posts
    1,852
    Thanked: 1

    Done!

    took me two full days between research, testing, and install, but I got it finished.

    I am working to get the complete HOW-To done. With pictures, wire colors, parts, etc. But for now....here are a few things.....

    I put the button next to the mirror defrost by the arm rest. This allowed me to keep all of the wiring in one easy to work with location. Plus, its easier to reach from either door, or back seat/cargo area.

    I put the roller switch behind the e-brake. It WILL NOT work on top of the existing park position roller switch. I tried it, but it doesnt hit any of the right grooves.

    So now, my tailgate will ONLY open when the e-brake is pulled.

  11. #26
    Member Since
    May 2002
    Location
    2000, Proton Yellow, VX, 0584
    Posts
    2,584
    Thanked: 10
    Cool! Looking forward to seeing the write-up. Never too late to change up.

  12. #27
    Member Since
    Jan 2009
    Location
    1999, Ebony Black, VX, 1614
    Posts
    1,852
    Thanked: 1
    I have completed the how to, but in PDF form. How should I upload that?

  13. #28
    Member Since
    Feb 2007
    Location
    2000 Proton VX - 0776
    Posts
    9,258
    Thanked: 0
    In the past, I've uploaded it to the Download Section & asked him to move it to the How2 section. IIRC, the How2 section doesn't allow pdf.

    Or better yet:

    Post it in this thread & then ask Moncha to add it to the How2 section. You can attach a pdf to a thread post.
    [SIGPIC][/SIGPIC]

    Put a smiley after you say that Bub.

  14. #29
    Member Since
    Jan 2009
    Location
    1999, Ebony Black, VX, 1614
    Posts
    1,852
    Thanked: 1
    Done.

    http://www.vehicross.info/modules.ph...warticle&id=49

    Let me know what you (collective) think

  15. #30
    Member Since
    Sep 2010
    Location
    1999,VX, 2477
    Posts
    742
    Thanked: 8
    I think it looks great, as I recently picked up an OEM hatch switch. The only thing I don't see is a list of parts besides the switch, a relay, and wiring. I.E., what kind of door popper setup did you use? Is there a part number to look for?

Similar Threads

  1. Tone's Popper Parts?
    By cr0sh in forum VX Modifications...
    Replies: 7
    Last Post: 04/03/2015, 07:20 AM
  2. Tone Hitch and Popper install
    By go2warp in forum VX Talk...
    Replies: 7
    Last Post: 01/25/2010, 08:35 PM
  3. Using the option button to control the door popper?
    By Zorak in forum VX Modifications...
    Replies: 15
    Last Post: 01/27/2007, 09:18 AM
  4. Anyone want a partial popper kit?
    By jbregar in forum VX Talk...
    Replies: 4
    Last Post: 10/15/2003, 07:16 AM
  5. Popper w/ pin Switch
    By Tone in forum VX Modifications...
    Replies: 2
    Last Post: 10/29/2002, 01:03 AM

Posting Permissions

  • You may not post new threads
  • You may not post replies
  • You may not post attachments
  • You may not edit your posts
  •  
$lv_vb_eventforums_eventdetails