Page 1 of 15 1 2 3 4 5 11 ... LastLast
Results 1 to 15 of 221

Thread: "Showroom New" Trim Restorer- info & experience

  1. #1
    Member Since
    Dec 2008
    Location
    Former owner 2001, Foxfire Red, #0663
    Posts
    7,311
    Thanked: 33

    "Showroom New" Trim Restorer- info & experience

    I've tried yet another cladding/trim restorer & reconditioning product, so this thread is for all the details.

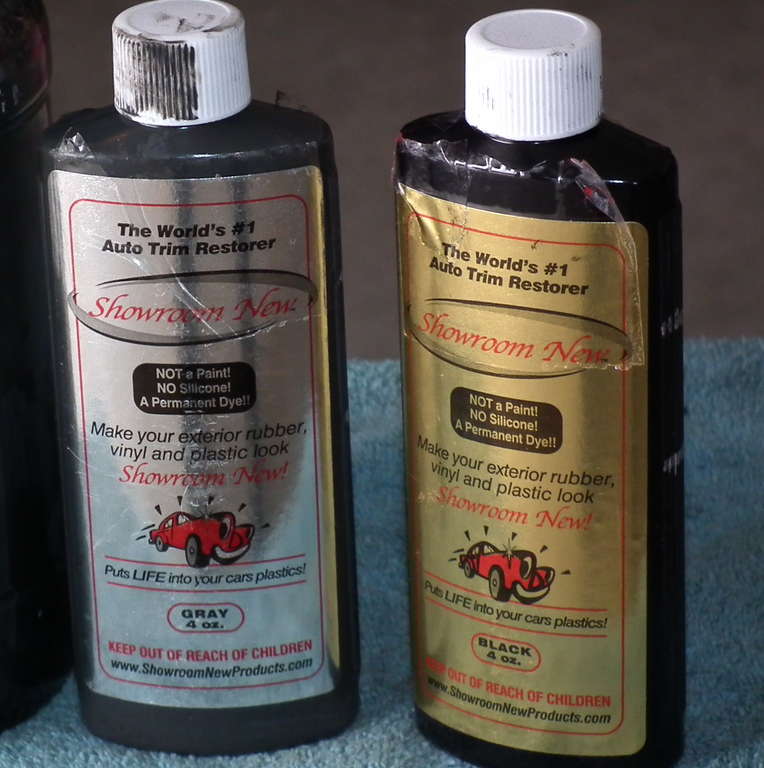
    SHOWROOM NEW - AUTO TRIM RESTORER

    This product is a permanent dye for the plastic and rubber trim and cladding.

    While I was waiting for my replacement bottle of TC Black Fusion a few weeks back, I started surfing for other products...again. Found a Ford F150 forum where several owners had tried a few "permanent dyes" for the plastic cladding. I don't recall seeing any "dyes" before. Read up on a few and decided on "Showroom New"
    http://showroomnewproducts.com/_mgxroot/page_10783.html

    It comes in Black and Gray.
    Sold on ebay $14.95 + $3.50 shipping or twin pack for $27.99 + $5.35.
    I also bought the smaller sponge roller & tray.
    :http://shop.ebay.com/?_from=R40&_trk...All-Categories

    I ordered both, to mix them and get a nice dark charcoal color. Seller advised mixing was OK.

    ~ Mixed colors in a glass jar, decided on a 2:1 black to gray ratio. Used all 4 oz of black, and 2 oz of gray. Used sponge roller for application.

    ~ Surface prep is only washing with soap. I used the pressure washer soap/rinse at the coin car wash place. Blasted with soap for 7 mins or so, same for rinse.

    ~ Did entire truck, and a 2nd coat on front bumper when I ran out. Took about 3-4 hrs.

    ~ Took about 6 hrs to really finish drying, and almost all of the streaking went away. See pics.

    ~ Emailed manufacturer for tips/advice. Some streaking can occur, but was advised not to keep rolling over and over as it does cause it to dry more rapidly. Also, use sufficient product to coat area, and do NOT try to stretch product (like I did on front bumper 2nd coat!)

    ~ Ordered another 4 oz Black. Got it a week later, mixed up same 2:1 mix.

    ~ This time I used a 4" foam brush. The roller tended to spew product out of the edges from the centrifugal force, causing you to go over and over it, eventually the product gets too dry to spread properly.

    ~Did entire truck again with foam brush. Really mastered application technique of long broad light strokes and had very minimal streaking.

    ~ I had a real problem with the front bumper on driver's side, since this was where I ran out the first time, and couldn't address the streaks any further cuzs it was drying out. When I used the foam brush for the next coat, it evened out some, but I still wasn't happy.

    ~ Got wild idea to try sanding area on the front driver's side bumper. Used 2000 grit sandpaper by hand and was able to sand down the thicker splotches.
    *** I can ASSURE you this is NOT a topical treatment, it's a dye that's absorbed into the plastic. I couldn't sand the color off despite 30 minutes of rubbing. I ended up with very dark gray particles on the ground after sanding.
    I also wiped it aggressively with a wet textured shop rag....nothing came off on rag...so rain will not affect it whatsoever.

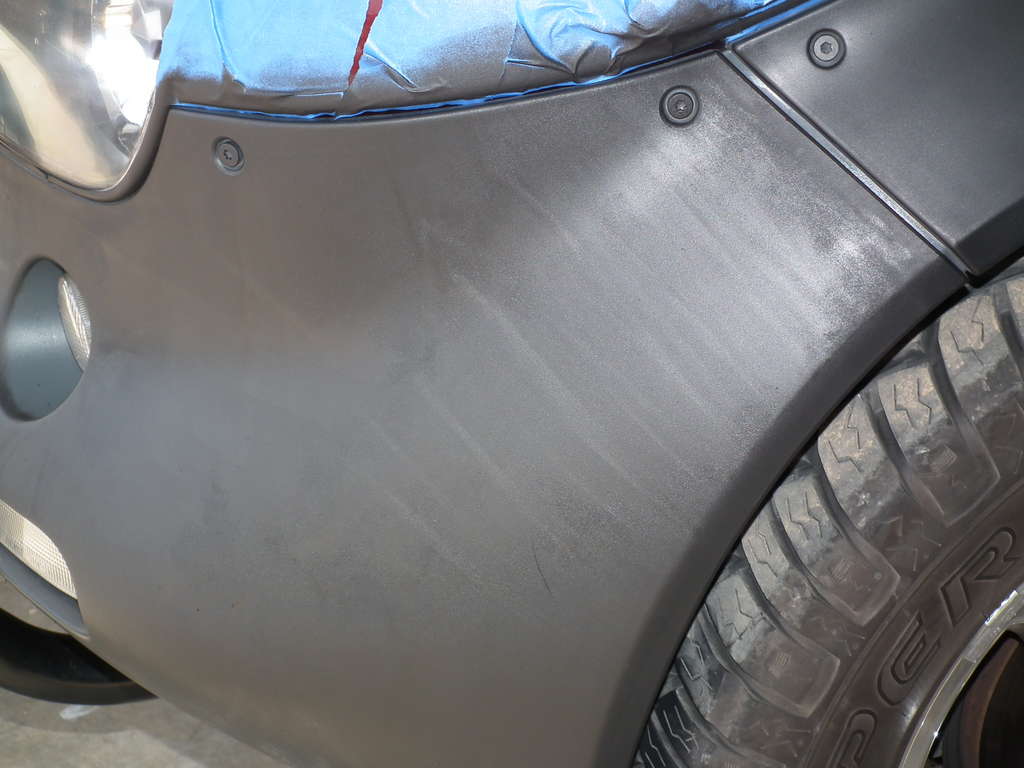
    ~ Used the foam brush and a fair amount of product and redid the front corner again. You can smooth out the product using the entire FLAT SIDE of the foam brush with lighter and lighter strokes to get it smooth. It came out better, but not perfect.

    ~ Rest of truck came out great, very minimal streaking. After thorough drying, almost all the streaks are gone. I'm very satisfied and love the darker charcoal gray color! It's way way darker than it was.

    ~It's not sticky, tacky or oily in any way, just a dry matte finish.
    Looks like mine is just a notch lighter than Ebenezr's with the Black Fusion. WAHOO! Finally!

    ~ MYSTERY SOLVED on my strange cladding!!! My cladding was definitely "coated" or dyed that lighter gray color. It's highly probable it's the "gray" ShowRoom New product. This explains several mysteries...why all my scuffs on the sills and the flat part of rear bumper where you load cargo in/out all scrapes were dark gray, why my cladding screws are uniformly light gray, why any significant scratches I had on my cladding were dark gray.....it's cuz it was coated with a light gray color and the scratches got down to the OEM color cladding!! Any scratches or abrasions can be touched up with a foam brush.

    And ya'll don't ever have to hear me whinning again about my light cladding!!!

    ~ One last point....I no longer have a "gas tat"...........

    I've uploaded lots of detailed application and comparison pics in picasaweb. You can zoom in on each pic to see really close details.
    https://picasaweb.google.com/1147574...eat=directlink


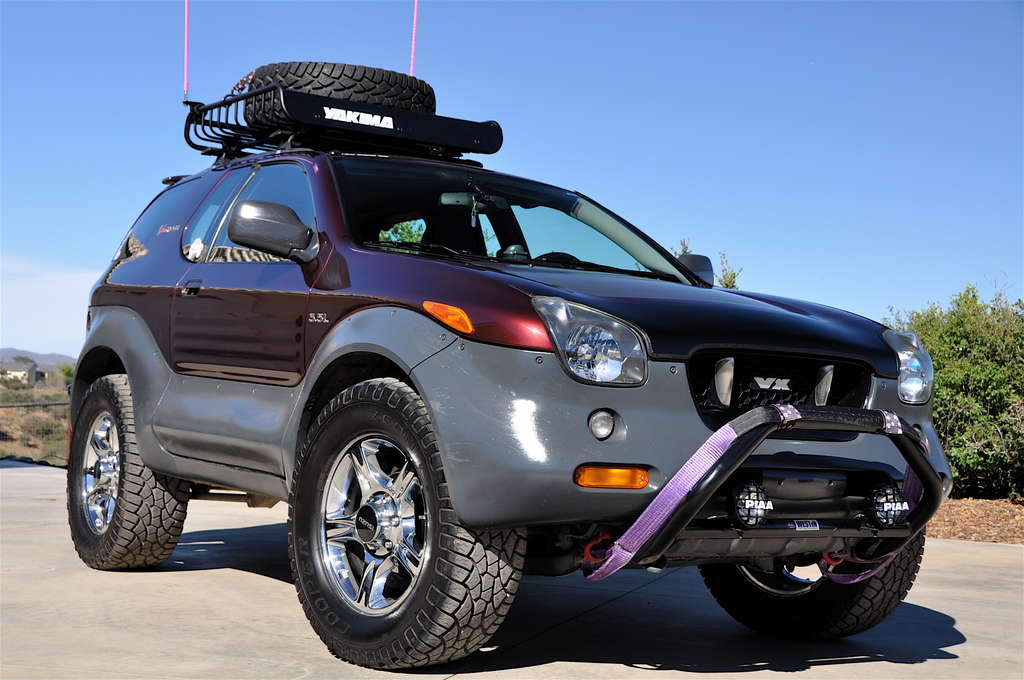
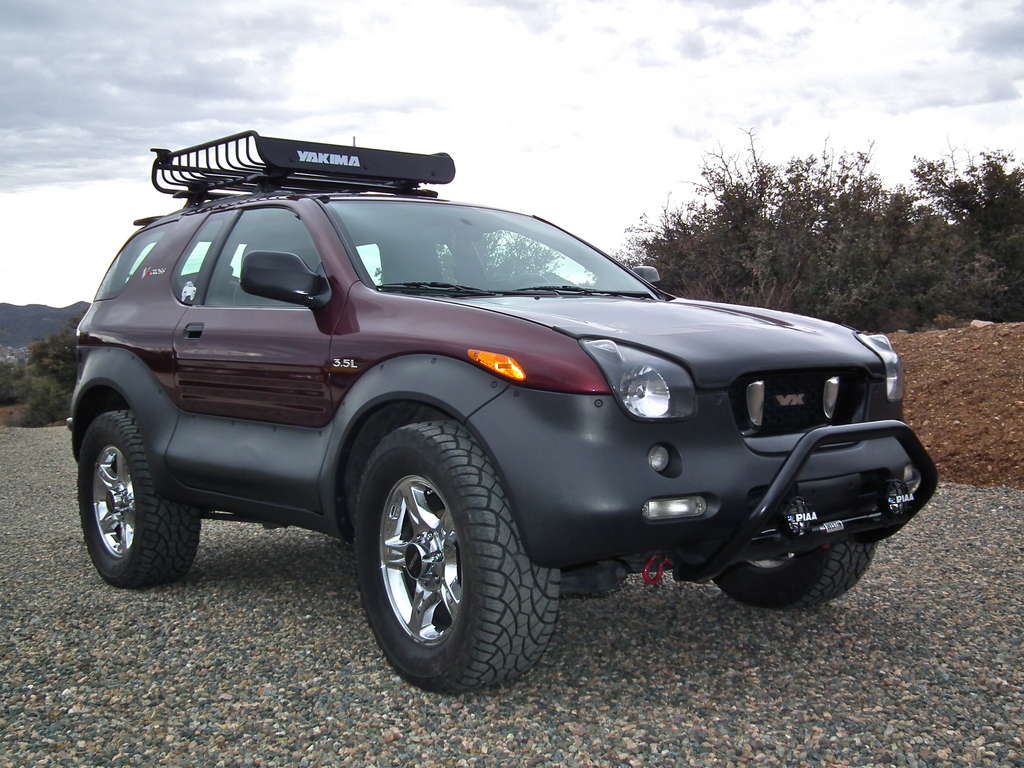
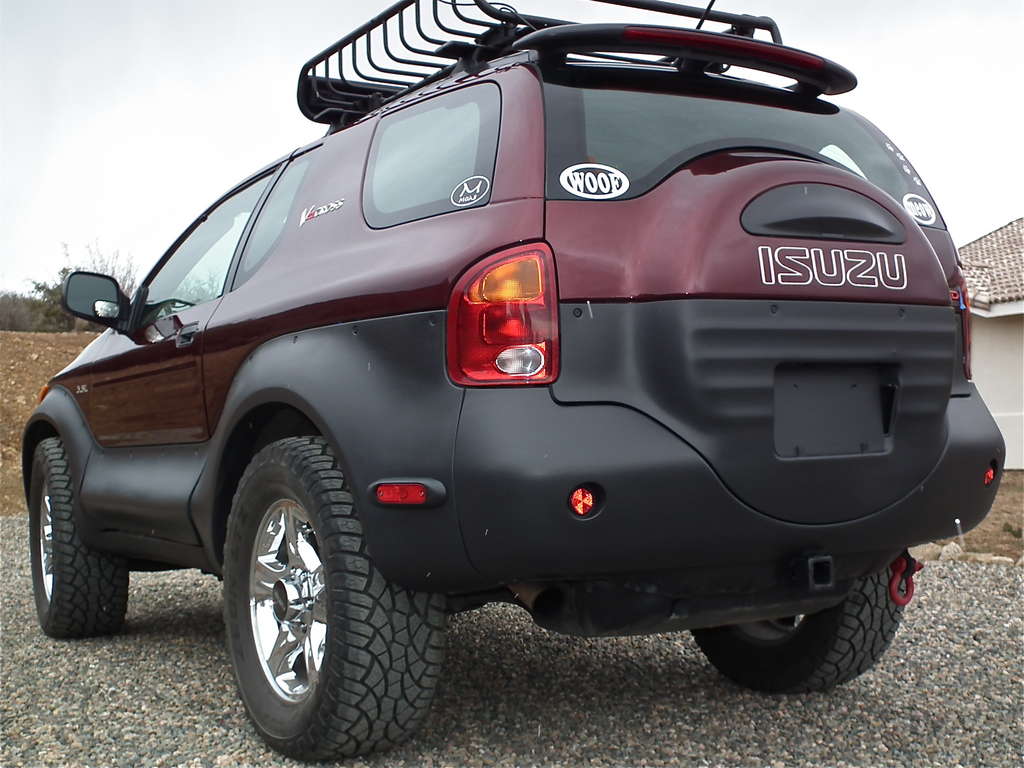
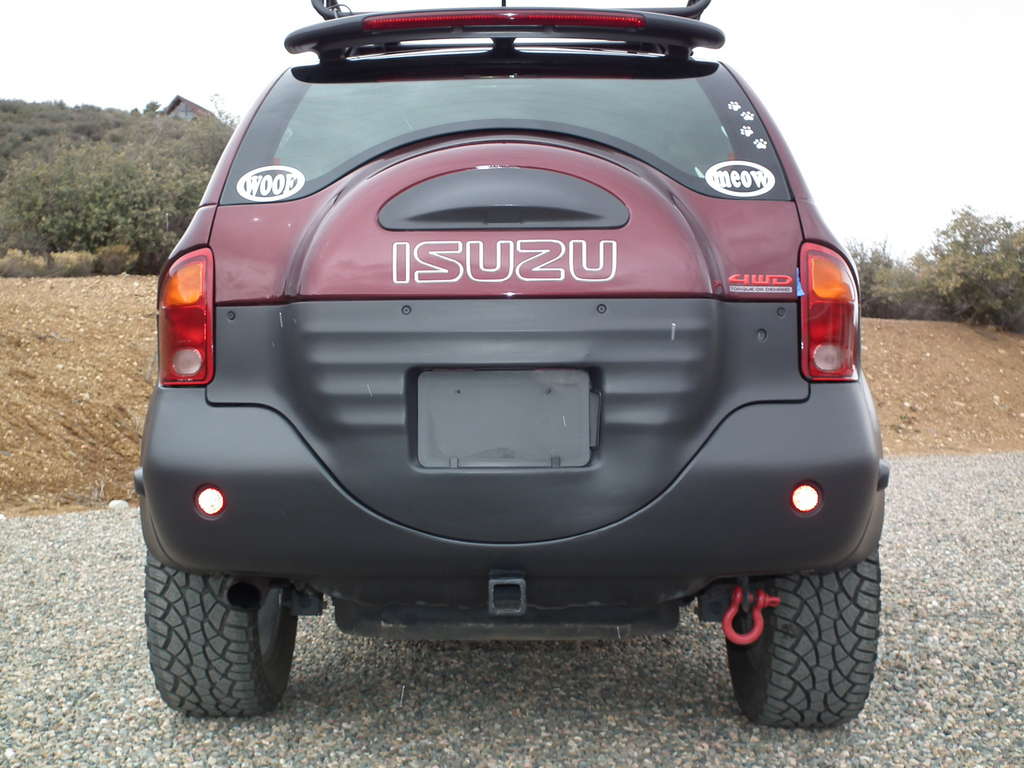
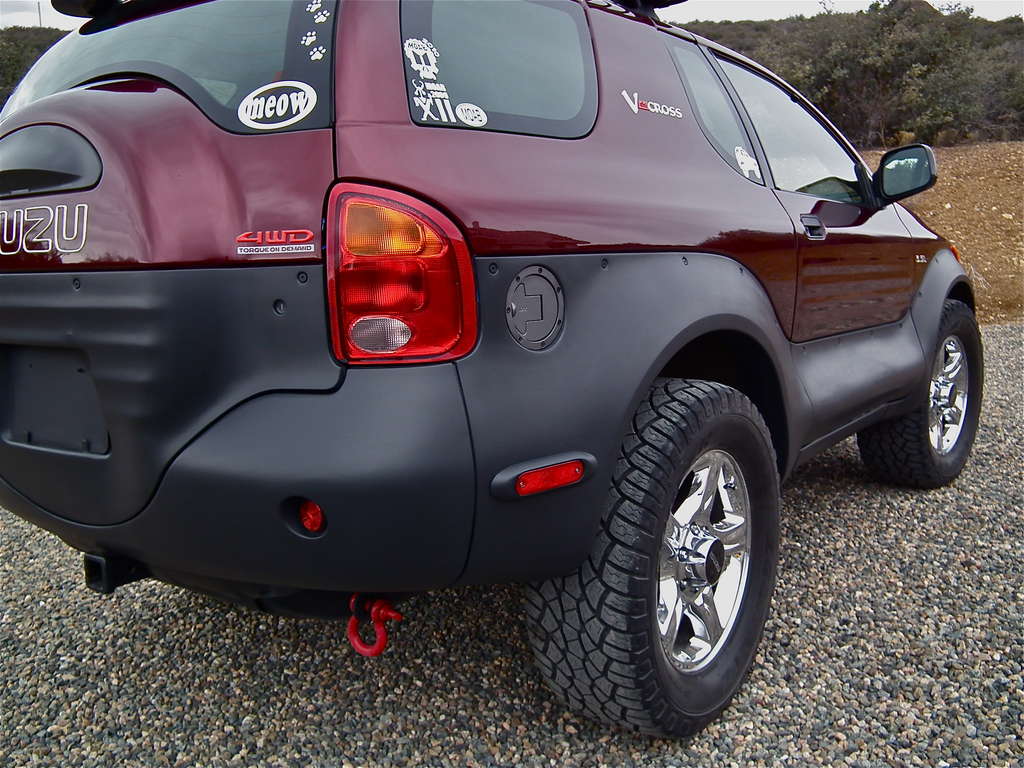
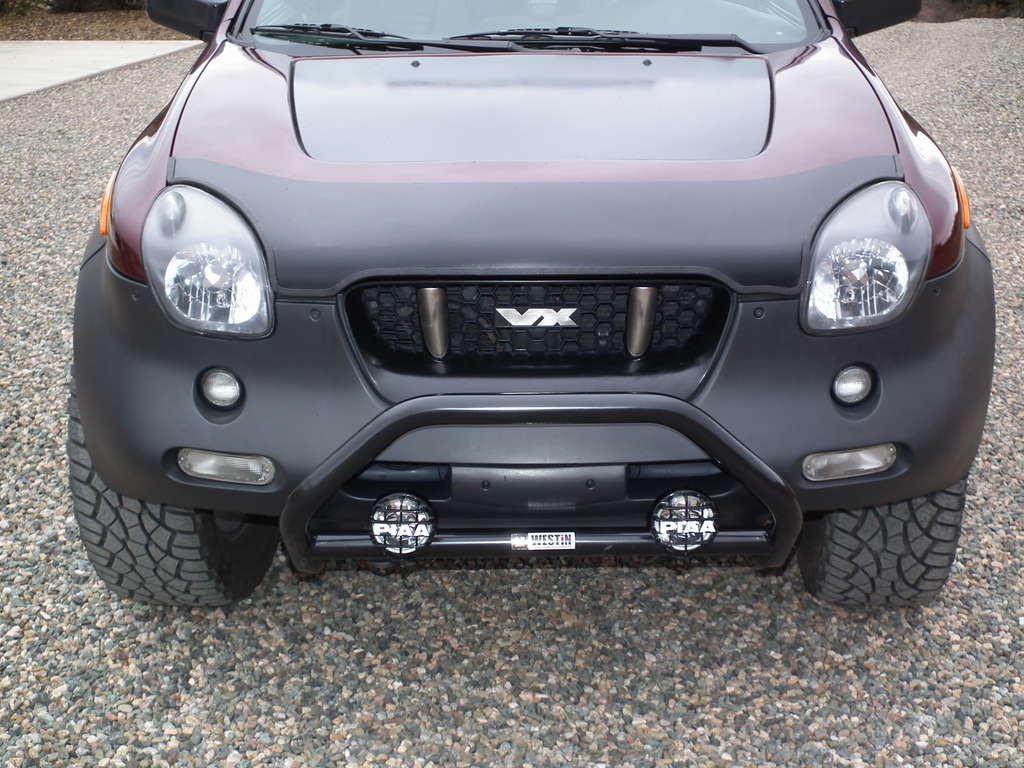
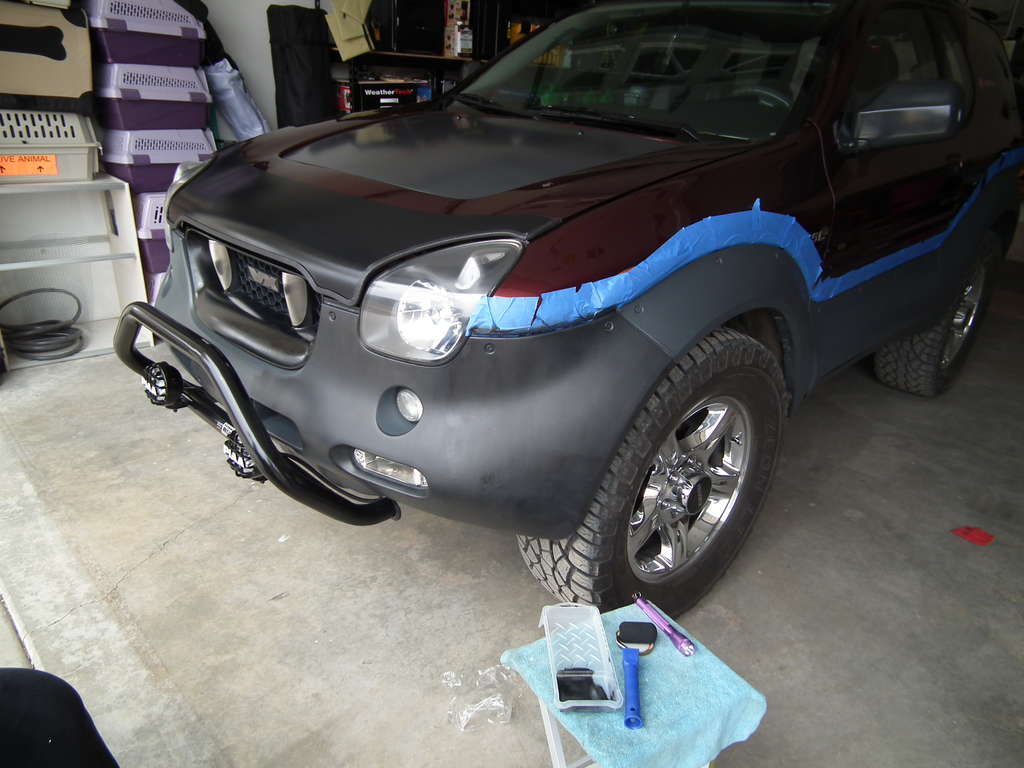
    Here's a few pics of the finished masterpiece! (my hood is not latched so it's up a little bit in these pics)
    I think it will look great with the silver skid plates that Rowhard is finishing up.
    I also installed my clear front turn signal lens covers I got from Bantan!
    I have a slight indent in pass door cladding you can see in pics.
    (that's snow flakes in some of these pics....brrr.....)


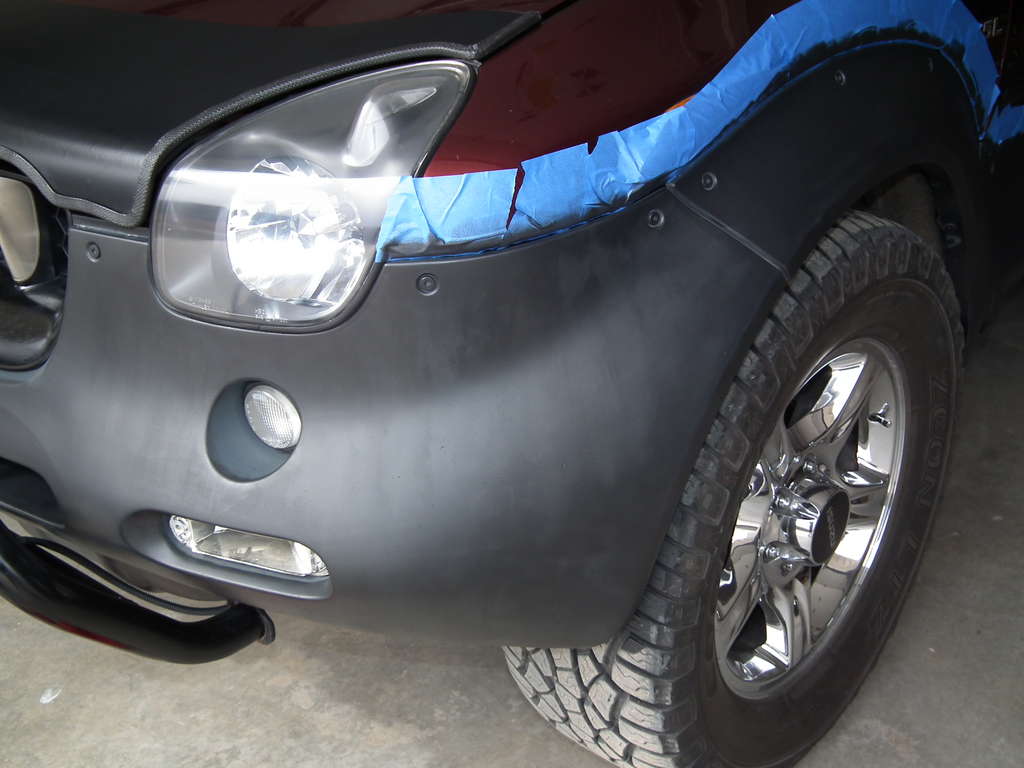
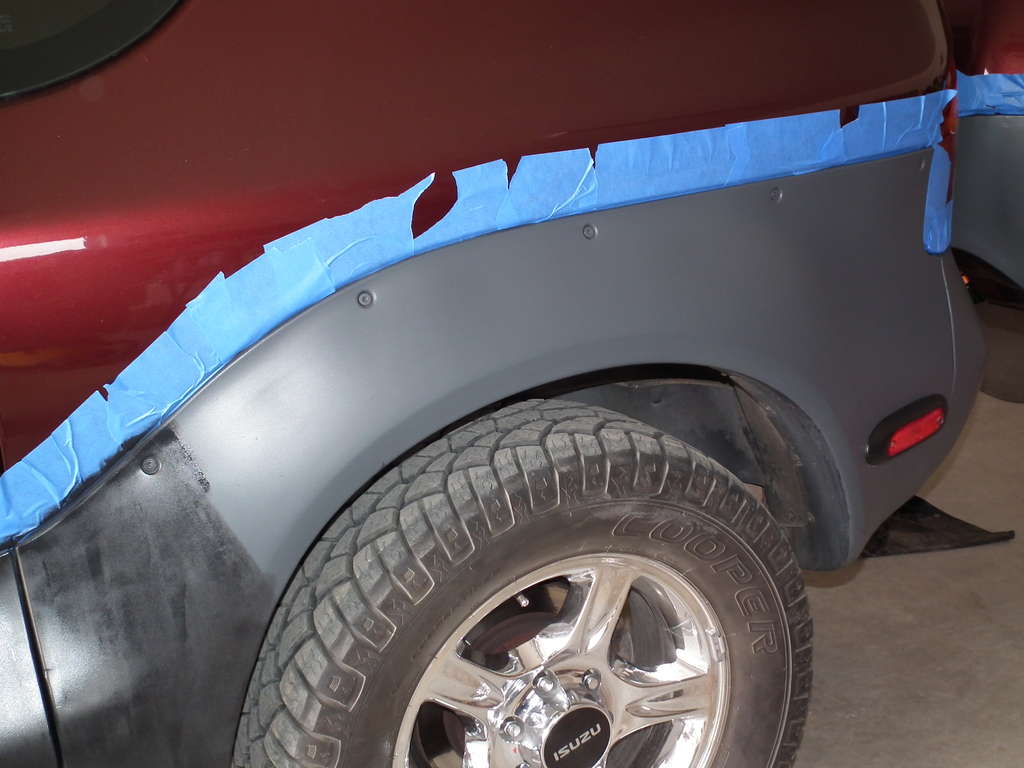
    Really shows how light my cladding was. Also, the SN was just freshly applied, very wet. Don't panic (yet)...the streaks magically disappear after it's dried....just do light coats and don't keep rolling it.


    This is after first coat, not yet completely dry.


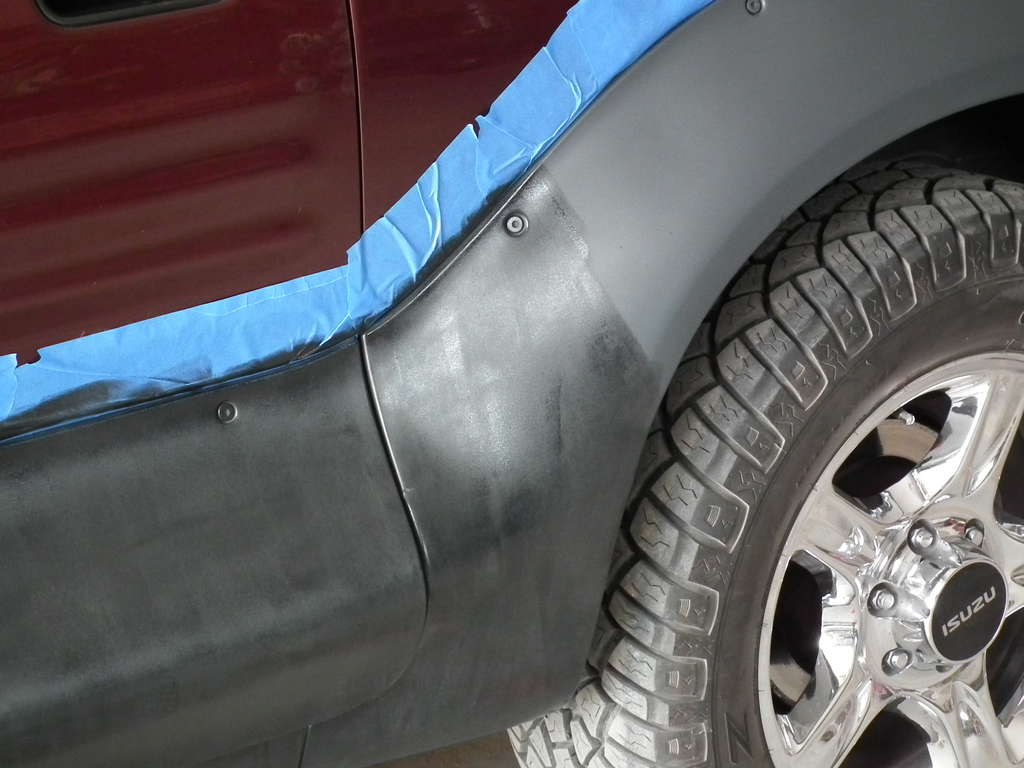
    This was after 2nd coat...But this was my problem area cuz I tried to stretch the stuff too far and rolled it too much causing it to dry faster and those streaks weren't budging. Check out the color difference in the front fog lamp area! WAHOO!!
    Last edited by VX KAT : 02/27/2011 at 12:20 PM
    VX KAT
    ....the adventure BEGINS ANEW! ...2015......
    Remember that life is not measured in the breaths you take, but rather in the moments that take your breath away.

  2. #2
    Member Since
    Apr 2008
    Location
    2000 Foxfire Red Mica, 0555 (RIP) & 0717
    Posts
    6,229
    Thanked: 3
    THAT'S AMAZING SUE!!!

    How hard was it to apply in the fog light recesses?

  3. #3
    Member Since
    Apr 2008
    Location
    2000 Foxfire Red Mica, 0555 (RIP) & 0717
    Posts
    6,229
    Thanked: 3
    And for comparison's sake for new members, this is a good before and after from Sue's gallery:

    BEFORE:


    AFTER:

  4. #4
    Member Since
    Sep 2010
    Location
    2000,Ebony,VEC,0013
    Posts
    683
    Thanked: 0
    Looks really good. Hey....your cars better than my car! No fair.

  5. #5
    Member Since
    Dec 2008
    Location
    Former owner 2001, Foxfire Red, #0663
    Posts
    7,311
    Thanked: 33
    Quote Originally Posted by Ebenezr View Post
    Looks really good. Hey....your cars better than my car! No fair.
    Nuh-uh...you got cool rims and are lifted!! Yours is cooler!

  6. #6
    Member Since
    Dec 2008
    Location
    Former owner 2001, Foxfire Red, #0663
    Posts
    7,311
    Thanked: 33
    I removed the front round fog lights and my turn signal lenses. For the fog light area I used a 1" foam brush and kind of did a 360 motion holding the brush in the same angle. It came out OK, there's a few fine lines on the horizontal surface.

    I haven't done the sills or door jams or rear bumper flat area when you open the door. I also have a lot of little areas I need to do some touching up around the cladding screws and a few small tiny spots on the upward facing portion of cladding where it meets the paint. My tape job wasn't perfect. I'm going to use a thin hobby paint brush to do these areas.

    I'm not as patient as you Ashley, nor is my hand as steady, I'm sure,.....so I've learned to live with some compromises.....you could do a more precise job than I did, by far!

    Oh, this stuff doesn't stick to the paint or plastic lenses either because it's not porous, it just rubs off like it was a dry piece of mud.

    It does, on the other hand stick to ANYTHING else...so wear black everything! I spilled the roller tray on my right thigh, soaked through my pants...didn't address it for about 5 hrs......left me with about a 8" x 5" skin tat! I scrubbed with everything I could think of that night and got the solid black off, but I still (8 days later!) have a pale black splotch on my thigh.....

  7. #7
    Member Since
    Nov 2009
    Location
    2001Proton 1432, ex 2001 Dragon Green Mica 0168 (RIP May 2017)
    Posts
    3,590
    Thanked: 31
    Nice work Sue!
    Live, Love, Forgive and Never Give Up

  8. #8
    Member Since
    Dec 2008
    Location
    Former owner 2001, Foxfire Red, #0663
    Posts
    7,311
    Thanked: 33
    Forgot to mention...look how it completely hide/covered the abrasion on the edge of the front bumper, on the part that wraps around and is part of the fender. A certain branch in Moab scraped that up and the scratches were dark gray......now ya can't even see anything there ....
    Last edited by VX KAT : 02/26/2011 at 11:04 PM

  9. #9
    Member Since
    Jan 2003
    Location
    2001, IronMan White, #440
    Posts
    1,750
    Thanked: 0
    Looks really good Sue! Did you do the hood insert or did you not have to?
    Tom
    "Through Great Sacrifice..... Great Rewards Will Be Achieved"

  10. #10
    Member Since
    Dec 2008
    Location
    Former owner 2001, Foxfire Red, #0663
    Posts
    7,311
    Thanked: 33
    Quote Originally Posted by tomdietrying View Post
    Looks really good Sue! Did you do the hood insert or did you not have to?
    Tom
    No, didn't do it...yet. I have one coat of Restore/Refinish on it and need to try to blast that off. It is starting to peel off. I'm hoping the smooth surface allows the R/R to be blasted off as easily as the cladding surface did...

  11. #11
    Member Since
    Jan 2011
    Location
    2001,proton yellow,0631
    Posts
    974
    Thanked: 0
    when comparing pics with ebenezers (w/TC Black Fusion) and kats comp pics....think im going with the "showroom new", product....
    Now if it holds up as well as R. Payne professes Black Fusion Does....

    The S/N seems less blotchy and more uniform....could be just the pics

  12. #12
    Member Since
    Dec 2010
    Location
    1999 WHITE IRONMAN 1207
    Posts
    259
    Thanked: 0
    It sounds like alot of work to me; we still love the Black Fusion but I understand you had a problem with it. We have never had a problem.

  13. #13
    Member Since
    Dec 2008
    Location
    Former owner 2001, Foxfire Red, #0663
    Posts
    7,311
    Thanked: 33
    Quote Originally Posted by RICHARD PAYNE View Post
    It sounds like alot of work to me; we still love the Black Fusion but I understand you had a problem with it. We have never had a problem.
    About the same amount of work as BF, I'm just very slow. Problem was possibly with the product getting frozen or too cold in shipment to me (according to prez) or something wrong with the sprayer, or both. This S/N is permanent permanent permanent dye....I can even apply BF on top of it. Now that I got the matte dark charcoal color I've been after, I'm kind of hesitating making it even darker with BF. The black or nearly black cladding looks really good on the lighter colors and black ones...maybe not so good on my darker Foxfire. Or maybe I'm just afraid of messing something up since I've got it at a stage I really like now. For some reason, I'm hearing this in my brain..."If ain't broken...."

  14. #14
    Member Since
    Dec 2010
    Location
    1999 WHITE IRONMAN 1207
    Posts
    259
    Thanked: 0
    Heck, if your happy keep it the way it is and you can always try Black Fusion on it if and when it fades. We use it on every VX and have not had a problem except that the light grey ones definately need two coats. Glad you are happy and is that not what it is all about?

  15. #15
    Member Since
    Jul 2003
    Location
    99'/astral silver/vehicross
    Posts
    422
    Thanked: 0
    EXTREMELY cool Kat. I'm going to be really interested to see if this turns out to finally, really be permanent. That would rock.

    The fact that it penetrated deep enough to color the plastic you had sanded off give me a lot of hope.

    I know you'll keep us posted.

    Also, FREAKING CONGRATULATIONS!!!! I'm glad you are finally happy with your cladding. It looks amazing now. Awesome, also, thanks for being the guinea pig!
    macintosh man

Similar Threads

  1. what removes tw trim restorer
    By sopo in forum VX Talk...
    Replies: 3
    Last Post: 09/14/2013, 07:44 PM
  2. Replies: 35
    Last Post: 10/04/2010, 01:37 PM
  3. Pin Up Calendar...""site Donation"".
    By JoFotoz in forum VX Talk...
    Replies: 14
    Last Post: 01/01/2009, 11:06 AM
  4. Replies: 36
    Last Post: 10/12/2008, 05:59 PM
  5. VX "Rattles" & "Squeaks" over time
    By tysamigo in forum VX Talk...
    Replies: 6
    Last Post: 03/15/2007, 07:36 AM

Posting Permissions

  • You may not post new threads
  • You may not post replies
  • You may not post attachments
  • You may not edit your posts
  •  
$lv_vb_eventforums_eventdetails