my favorite name for a beauty salon...."Curl Up and Dye"....sorry scrambled brains and flash backs

 Super VXer
my favorite name for a beauty salon...."Curl Up and Dye"....sorry scrambled brains and flash backs
Super VXer
I just about finished doing mine. I went with straight black. Very neat stuff!! Took me about one bottle to do 75% of the truck. I did a half hearted scrubbing. Seems to be working great. I just put it on with a cheap 1" paint brush. The streaks dried perfectly fine. Thanks for the find Sue! After my URE trip, I will post up how it holds up to pressure washing and mud. It makes the truck look new again! (well, minus the herculined hood and fenders, the rear mounted tire, the mudders, rims, hood scoop....)
I predict future happiness for Americans if they can prevent the government from wasting the labors of the people under the pretense of taking care of them.
Thomas Jefferson
Super VXer
Good to hear it worked out for you Marlin.Originally Posted by VX KAT

Greg (gergmon) came up yesterday and we did his in the black. Used a foam brush for first coat, then the terry cloth/sponge for 2nd coat. Used 2 full bottles.
SOME MORE TIPS:
~When applying it with the foam brush or terry sponge be aware of the pressure your fingers are putting on it, as we found that makes streaks where you apply your finger pressure. Solve this by holding your applicator with your finger tips pointing up and make your stokes go left to right, right to left, AND use progressively lighter pressure.
~Greg discovered you can use your gloved hand to smooth the surface after it's had a just few minutes to set.
~SAND PAPER- One area got a little thick cuz somebody kept rubbing it, so Greg tried to sand it with some 1500 and 2000 grit. Probably actually need a little courser grade. It was pretty dry but it did smooth it a little bit.
~He applied it on the mirror housings. At first it left brush/applicator marks (probably what Atilla was talking about). So then Greg tried rubbing it with his gloved hand and a light sanding with 2000. More dye, repeat a few times. It came out pretty good. That plastic is pretty light gray (like our roof rails), and it darkened it tremendously. It seemed like it was absorbing it since the sand paper didn't make a bald area.
He's going to buy some more and try spraying the next/final coat on.
His cladding was really dark to begin with and this only darkened it a little more. It does appear the "Black" is not a jet black, but more a charcoal black.
VX KAT
....the adventure BEGINS ANEW! ...2015......
Remember that life is not measured in the breaths you take, but rather in the moments that take your breath away.
 Administrator
To assure even pressure, could you use something like a rubber sanding block?
Scott / moncha.com
Super VXer
Yes, that'd work. Figure out some way to attach the sponge thing.
 Super VXer
I laid down two coats of "Showroom New" today, and it looks really good!! Used about 8/10ths of a bottle. Very minor blotchiness that does indeed appear to go away as the stuff dries. Its going to get another coat tomorrow I think. But man it sure made the trail rash disappear! I really couldn't be happier. It did exactly as I had expected.
It does tend to stick to our plastic lighting lenses tho. A a wipe or bit of scrubbing will remove it if fresh, goo-gone removes it nicely even when dry. Stuff REALLY liked to stick to my fuel door for some strange reason.
Its more work than R/R and the results are completely different so IMHO the products should not be expected to compare. They are intended to do two different things IMHO. This is definitely a colorizer, not a refinisher. I wonder if they will play well together?
Super VXer
Great to hear Grif! What's you use to apply it? And wow, how'd you get 2 coats out of 8/10 of a bottle?
Since the same company sells some type of topcoat product, I just get the feeling R/R would work on top of this, just my hunch though.
Super VXer
I used terrycloth covered foam applicators. Round ones from walmart. They came in a pack of 6. Actually 2 terrycloth ones and the rest microfiber covered ones. The microfiber one I tested worked just as well.
As to why I used so little of the product? Well you obviously have more cladding than I do. haha...
Sue I can only surmise that you needed more product due to the fact that your cladding was in worse shape. After all, your cladding was more grey for whatever reason and thus needed more colorant. Overall my cladding wasn't badly faded at all, my intent was to mask the superficial (and some not too superficial) scratches from trail rash and it was a task this product handled with aplomb.
Super VXer
Ok final coat was layed on today.
This time I used a sprayer. I just happened to have one of the Preval� aerosol spray cans that Showroom New recommends and sells. Didn't buy it from them, just knew I had one here in the batcave somewhere.
Diluted the dye per their instructions with 2 parts mineral spirits to one part dye. I had doubts that that little spray can had enough propellant, but it really worked fairly well.
My intent this time was to even out some minor blotchiness and hope the spray could penetrate some of the crevices that no other applicator could such as the wells around lights, between cladding panels, and deep into the cladding screw wells.
Let me tell you right off the bat that I suck at spray painting. I always cause drips and runs and my fix for either is to spray more which always drips and runs worse.
I knew overspray was going to be an issue, but was confident that with spray can in one hand, a rag damp with mineral spirits in the other, and a dry rag at my belt to mop up any errant problems all should be ok. My plan worked well. Got the dye really into the problem areas without too much drip and was able to quickly remove any overspray on the body and lenses.
I hit the problem hard to get areas, then did a general light coat to even out. I did get some drips of course, but really, it all works out ok. Once you dilute the stuff, its really mostly solvent at that point. There are only miniscule amounts of solids in the dye. The rest is solvent which is going to evaporate away eventually. So when you get drips and runs, just let them dry fully, you wont see 99% of it a few hours later. If you do, a clean applicator dampened with mineral spirits and VERY light pressure will even it out. I think the same process will work if you have streaks after hand application as well.
All told over the weekend project I ended up using 1.5 bottles of dye, about 10 ounces of mineral spirits, three terry/micofiber coated applicators, four terrycloth rags, a few blue shop papertowels and one Preval sprayer can which is prolly 1/4 full still. Oh, and about 6 rubber gloves.
YMMV
Super VXer
Wow, great details. Glad somebody tried the spray method.
The solvent issue must be why the streaks disappeared so dramatically for me over several hrs.
Pictures!!!????
Super VXer
so....an airbrush will achieve the same results?
Super VXer
Yes Sue, when you look at how the stuff really works its 98% solvent from the getgo already. When you dilute it even more for spraying it still covers very well.
Pretty sure I know whats in this stuff, and could prolly make my own at this point.
Super VXer
Airbrush would be ideal.
If i had one, i would have used it. Just be sure to dilute.
Super VXer
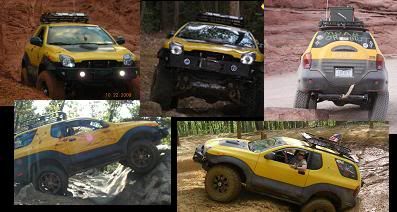
Just got back from URE. I dragged the whole drivers side down a mud wall, enough that it was all that kept me from tipping. The cladding was scratched, but still black!! The mud washed off, and it still looks good. I am sold on this stuff now!
Super VXer
Probably a good example of where GatorBack would NOT be the product of choice. But hey, if you don't plan on dragging the entire side of your truck on the ground like Marlin (), GB would be perfect.
GB gives that perfect smooth finish too, looks so good...but folks like Marlin would just chew it up and destroy it...what's that program called "Destroyed in Seconds"?....I'll bet that's what Marlin's parents said alot when he was growing up...
 Posting Permissions

 Reply With Quote