Page 3 of 3 FirstFirst 1 2 3
Results 31 to 41 of 41

Thread: ... and just like that.

  1. #31
    Member Since
    Jun 2010
    Location
    2000 Proton VX 0630
    Posts
    385
    Thanked: 0
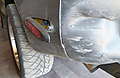
    So... I took the rear bumper cover off and started playin' around with the heat gun and various other tools of destruction and got the rear quarter cladding lookin' sweet!

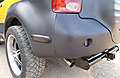
    I have the repair work finished on the rear cover and will paint it today... It's a tricky operation to match the raw texture of the molded plastic, so we shall soon see if I remember what I'm doin'...
    [SIGPIC][/SIGPIC]

  2. #32
    Member Since
    May 2010
    Location
    1999 Ebony 1716
    Posts
    1,196
    Thanked: 0
    Did you ever figure out how to post pics of the destruction? Would be cool to see before and after of the cladding and how you did it.

  3. #33
    Member Since
    Jun 2010
    Location
    2000 Proton VX 0630
    Posts
    385
    Thanked: 0
    Believe it or not I did...

    As of now, if you look in the recently added pics on the main page, you will see 4 pics I uploaded. (also attached them into my original posting in this thread)

    2 of those pics show the damaged rear bumper and cladding.

    By the time my paint showed up at the shop yesterday it was too late to paint the bumper AND install.... I'm heading back there today to put everything back together.

    I'll post pics and give some explanations on repairing raw cladding later

  4. #34
    Member Since
    Jun 2010
    Location
    2000 Proton VX 0630
    Posts
    385
    Thanked: 0
    I finished the repairs to the rear damage... I estimate I saved at least $600 or more if left at a body shop.
    Unfortunately, I didn't take any "during" pics to illustrate how repairs were done... guess I have to keep some trade secrets...
    Also tinted the signal lamps and rear reflectors by adding a small amount of graphite black tint directly into some clearcoat. I'll eventually do the taillights and headlights the same way...

  5. #35
    Member Since
    Jan 2003
    Location
    2001, IronMan White, #440
    Posts
    1,750
    Thanked: 0
    Fantastic!

    I don't believe it though. You have to show me a little proof besides a before and after pic.

    Peace.
    Tom
    "Through Great Sacrifice..... Great Rewards Will Be Achieved"

  6. #36
    Member Since
    Jun 2010
    Location
    2000 Proton VX 0630
    Posts
    385
    Thanked: 0
    ** after removing rear cover, heat up the whole corner using heat gun from the back side (hair dryer on steroids... do not use on you hair!... )

    ** while hot, I use head of hammer to push out damage.

    ** now, basic shape is formed. There will be imperfections, but nothin' a skim coat of polyester putty can't handle. Do not use bondo or any other filler... it will not stick and will peel right off.

    ** sand smooth to prepare for primer.

    ** once primer is set, here is my creative parts... I use a type of clear texturizer, normally sprayed over a finished paint job to act as a chip guard. A couple light coats of this spray, followed by a couple coats of the bumper color.

    ** Once dry enough, I lightly wet sand with 600 grit to knock down the texture and flatten it out. It is now ready for the final coats of color. I've found that SEM products work great for plastics.

    ** finished product sure beats shelling out hundreds of dollars for new parts!

  7. #37
    Member Since
    Jun 2010
    Location
    2000 Proton VX 0630
    Posts
    385
    Thanked: 0
    After well over 20 years of doing autobody paint and repair, I do have a few tricks up my sleeve. Even though last few years I"ve had 3 different operations...

    ** replaced L5,4,3 fusion L2-1
    ** fusion C4-5
    ** and just a month and a half ago, I had brain surgery to repair an anyuerism located behind my left eye.
    "I ain't dead, yet!"

    I would gladly try to answer any body and paint questions people may have.

  8. #38
    Member Since
    May 2010
    Location
    1999 Ebony 1716
    Posts
    1,196
    Thanked: 0
    I will have a ton soon enough. I'm turning my garage into a paint booth to try out my hand at a hot rod style flat black on an 85 SVO.

  9. #39
    Member Since
    Jun 2002
    Location
    2000 Ebony VX #263 ****** VX-2 My weekend car
    Posts
    2,067
    Thanked: 7
    Quote Originally Posted by Luna X View Post
    After well over 20 years of doing autobody paint and repair, I do have a few tricks up my sleeve. Even though last few years I"ve had 3 different operations...

    ** replaced L5,4,3 fusion L2-1
    ** fusion C4-5
    ** and just a month and a half ago, I had brain surgery to repair an anyuerism located behind my left eye.
    "I ain't dead, yet!"

    I would gladly try to answer any body and paint questions people may have.
    My dear, with work like that you'll be in demand to open up a VX cladding hospital..
    Anita
    2000 Ebony #263
    Original Owner- love her too much to part with her.
    AnitaProtich.com

  10. #40
    Member Since
    Jun 2004
    Location
    99 Astral Silver VX #1872 + 99 Ironman WIP
    Posts
    10,613
    Thanked: 1

    Thumbs up

    Quote Originally Posted by Luna X View Post
    I finished the repairs to the rear damage... I estimate I saved at least $600 or more if left at a body shop.
    Unfortunately, I didn't take any "during" pics to illustrate how repairs were done... guess I have to keep some trade secrets...
    Also tinted the signal lamps and rear reflectors by adding a small amount of graphite black tint directly into some clearcoat. I'll eventually do the taillights and headlights the same way...
    Dude...you gots some MAD body & fender skillz.........


    Nice work!

  11. #41
    Member Since
    Jun 2010
    Location
    2000 Proton VX 0630
    Posts
    385
    Thanked: 0
    I appreciate the nice words..... plus, it feels good to start being productive again.

Posting Permissions

  • You may not post new threads
  • You may not post replies
  • You may not post attachments
  • You may not edit your posts
  •  
$lv_vb_eventforums_eventdetails