Results 1 to 15 of 25

Thread: Hood scoop install, brief how-to

Hybrid View

Previous Post Previous Post   Next Post Next Post
  1. #1
    Member Since
    Dec 2008
    Location
    01, LineX tan/black, 1055
    Posts
    3,380
    Thanked: 0

    Hood scoop install, brief how-to

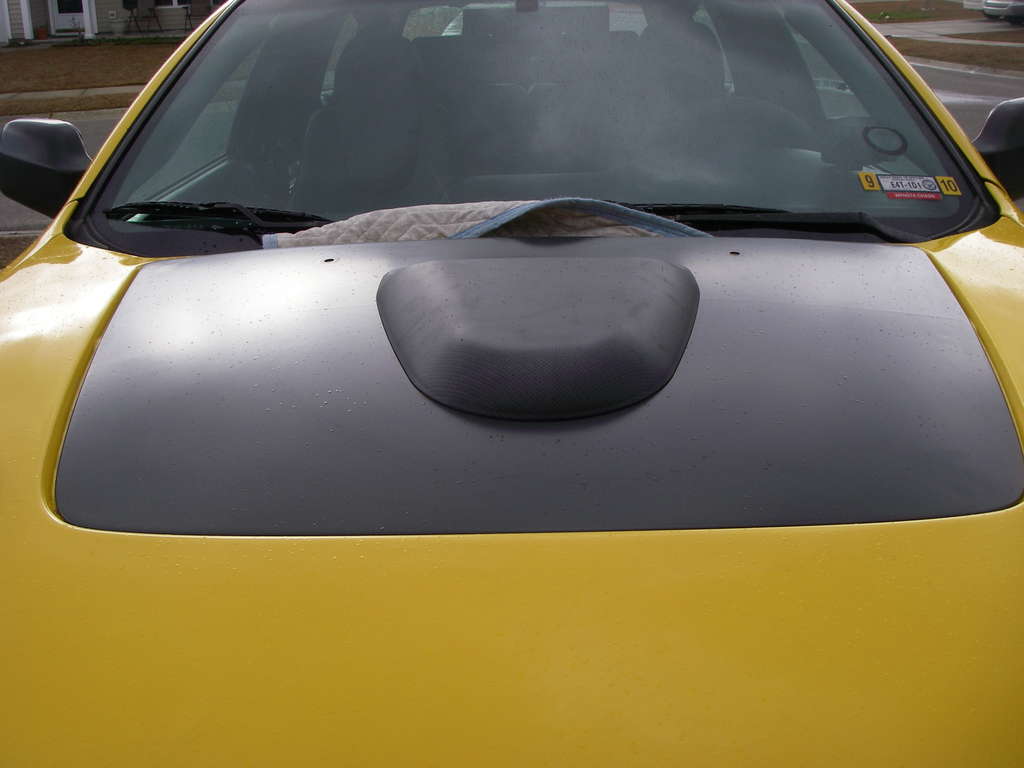
    Here is a quick how to for a FUNCTIONAL hood scoop. I bought a pseudo carbon fiber scoop at Pepboys for about 40 dollars. I got an airsaw from Harbor Freight for 17 dollars. A roll of door edge trim, 9 dollars and thats all you need to get beyond what most already have in their garage.

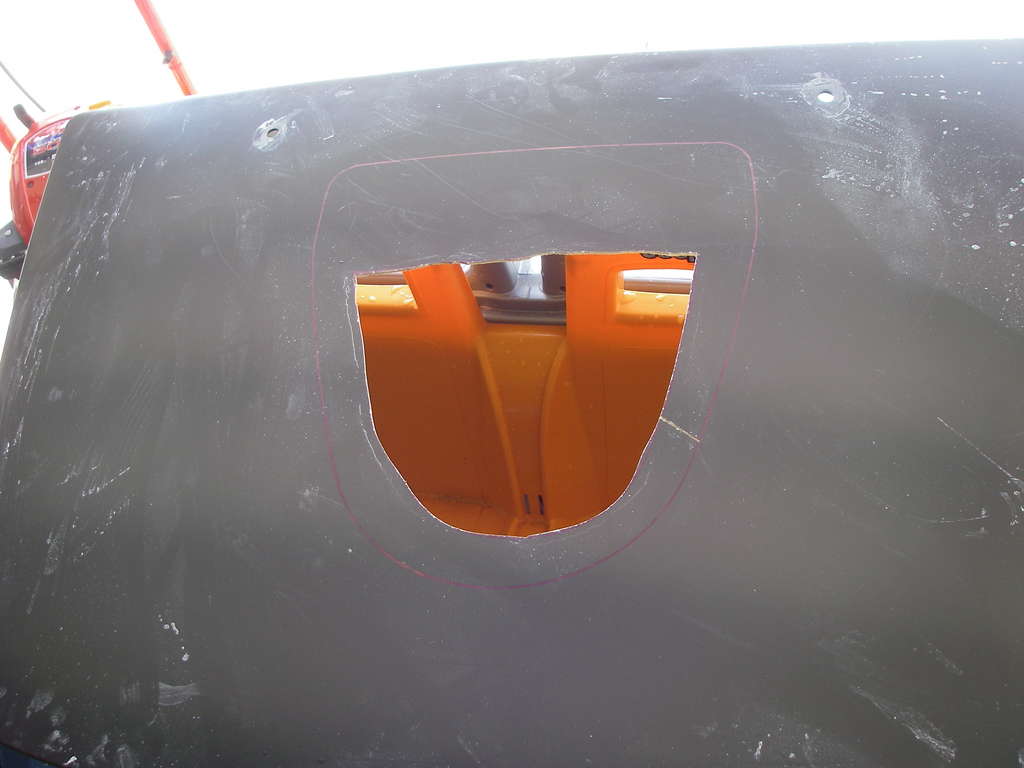
    Step one, remove insert, its thin fiberglass so easy to cut. Mark the outline for the scoop with a sharpie marker, don't worry it will come off with degrease/409. Drill out a center hole with a 3/8 bit or so. Then drill several holes around the perimeter of the outline so the fiberglass can be cut in small pieces.
    Last edited by Marlin : 03/02/2009 at 04:33 PM

    I predict future happiness for Americans if they can prevent the government from wasting the labors of the people under the pretense of taking care of them.
    Thomas Jefferson

  2. #2
    Member Since
    Dec 2008
    Location
    01, LineX tan/black, 1055
    Posts
    3,380
    Thanked: 0
    The hole doesn't have to be perfect, no one will ever see it.
    Next, clean the top of the insert with a alcohol to ensure the adhesive has a good surface to stick to. Make sure you have your alignment good, you only get one chance.Next, set the insert back on the hood, and using the mounting studs as a reference, trace out the outline for the cut in the hood itself. Make sure you put something under the hood when cutting, metal shaving anywhere are bad, they will rust and get into everything. I used a magnet with a paper towel to pick up most of them and then flushed the rest. Do not push on the shavings, they will scratch your hood. Use the same procedure for cutting the hood, drill some holes and go to town with the airsaw, it took less than 5 minutes to cut out, that saw was no joke.
    Last edited by Marlin : 03/02/2009 at 04:34 PM

  3. #3
    Member Since
    Dec 2008
    Location
    01, LineX tan/black, 1055
    Posts
    3,380
    Thanked: 0
    make sure you have primer ready after you are done cutting to primer the newly exposed metal. I used rustoleum. I realize my hole is not perfect, I didn't really care, my scoop is functional to help keep the engine bay cooler. I then took some weather strip adhesive in yellow and glued door edge guard to the newly exposed surface to protect it and me. Those edges were sharp. I threw away the hood baffle, my Vx is loud anyway, so I don't care about sound deadening anything. It came out great, about 1 hour or so, less than a hundred bucks. I would put myself at a medium skill level. The rocksliders install was way harder and labor intensive compared to this project.


    Last edited by Marlin : 03/02/2009 at 04:36 PM

  4. #4
    Member Since
    Apr 2007
    Location
    2001, Proton #1238
    Posts
    1,409
    Thanked: 0
    Looks great! 
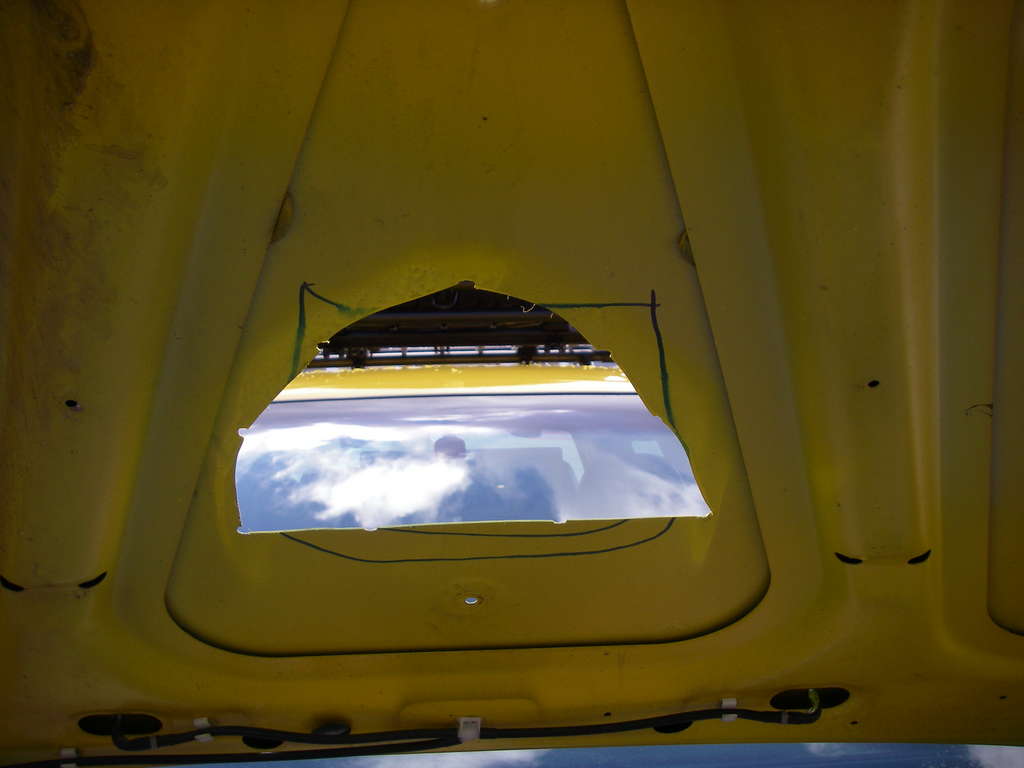
I was toying with the idea of doing a heat bleeding vent similar to the ones used on the Australian rally VXs. I’m trying to keep a pre runner theme going with my mods.

    P.S. I really like the sliders.

    Cars designed by spreadsheets make sense. Cars designed by engineers make history.

  5. #5
    Member Since
    Dec 2008
    Location
    01, LineX tan/black, 1055
    Posts
    3,380
    Thanked: 0
    Thanks, I still need to cut the fronts off the sliders, they rub the tires a bit sometimes. They fit so good, but only to factory standards, so if you have to do cutting/hammering to fit bigger tires, you will have mod the sliders as well. A good job for the cutoff wheel and grinder.

    Still thinkin about the stripes, I just gotta find something unique, maybe a smaller pair of red stripes?

  6. #6
    Member Since
    Jul 2005
    Location
    Former 00' Kaiser #0804, 98 White 4Runner SR5
    Posts
    3,761
    Thanked: 0
    hmm...i dig the scoop...

    maybe ill look into getting ahold of a 4 runner hood and seeing what happens...
    "Do Not Seek Praise. Seek Criticism."

    "If You Can't Solve A Problem, It's Because You're Playing By The Rules."

    "The Perosn Who Doesn't Make Mistakes Is Unlikely To Make Anything."

    -Paul Arden

  7. #7
    Member Since
    Aug 2008
    Location
    2001, PROTON YELLOW, VehiCROSS, 1451
    Posts
    1,955
    Thanked: 0
    Quote Originally Posted by Marlin View Post

    Still thinkin about the stripes, I just gotta find something unique, maybe a smaller pair of red stripes?
    MARLIN--- Excellent job!!! I'm amazed that you've done all of these mod's in your driveway, as your garage is currently used for storage. Your neighbors must think you're totally obsessed and just shake their heads in disbelief when they see you constantly working on your VX.

    I like the idea of the rear-facing hood scoop to remove excess heat from the engine bay without ramming rain & dirt as with a front-facing hood scoop. I also liked the "mesh screen" (in your photo gallery) that prevents debris from possibly falling down the hood scoop opening. JOHNNYAPPOLO made a good point regarding if "engine fumes" might find their way into the cabin interior via the fresh air vent near the windshield???

    Regarding "striping" of the Rocksliders (I presume)--- How about some Black 3M "reflective" semi-trailer tape along the side edge of the Rocksliders??? During the day, it would look stealthy Black; but at night, the Black 3M "reflective" tape would light-up when headlights shine on your VX from the side (way cool). Go to: www.ReflectivelyYours.com , and check-out their cool "refective" products for possible ideas/applications!!!

  8. #8
    Member Since
    Jun 2004
    Location
    99 Astral Silver VX #1872 + 99 Ironman WIP
    Posts
    10,613
    Thanked: 1
    Quote Originally Posted by Marlin View Post
    make sure you have primer ready after you are done cutting to primer the newly exposed metal. I used rustoleum. I realize my hole is not perfect, I didn't really care, my scoop is functional to help keep the engine bay cooler. I then took some weather strip adhesive in yellow and glued door edge guard to the newly exposed surface to protect it and me. Those edges were sharp. I threw away the hood baffle, my Vx is loud anyway, so I don't care about sound deadening anything. It came out great, about 1 hour or so, less than a hundred bucks. I would put myself at a medium skill level. The rocksliders install was way harder and labor intensive compared to this project.
    Nice...that's how I did mine. (almost EXACTLY, that scares me a little...)

    The only difference being, I fabbed up a diverter plate on the bottom side of the hood to channel any incoming water, from rain or snow melt, to the front of the engine, where it can drip down near the timing belt cover.
    I made it out of a piece of aluminium diamond plate. (12" x 24" properly trimmed & bent) It can easily be removed (4 sheet metal screws) for running around in the heat of the Utah desert...

    Let me know if you want pics...& SPEAKING of pics, please post multiple images VERTICALLY, not horizontally. (look in the options menu of the top bar)
    The first time I looked at this thread, I didn't even see the pics that were off screen to the right...
    Last edited by Ldub : 03/02/2009 at 05:48 AM

  9. #9
    Member Since
    Dec 2008
    Location
    01, LineX tan/black, 1055
    Posts
    3,380
    Thanked: 0
    Quote Originally Posted by Ldub View Post
    Nice...that's how I did mine. (almost EXACTLY, that scares me a little...)

    The only difference being, I fabbed up a diverter plate on the bottom side of the hood to channel any incoming water, from rain or snow melt, to the front of the engine, where it can drip down near the timing belt cover.
    I made it out of a piece of aluminium diamond plate. (12" x 24" properly trimmed & bent) It can easily be removed (4 sheet metal screws) for running around in the heat of the Utah desert...

    Let me know if you want pics...& SPEAKING of pics, please post multiple images VERTICALLY, not horizontally. (look in the options menu of the top bar)
    The first time I looked at this thread, I didn't even see the pics that were off screen to the right...
    Thats a good idea...I never thought of directing the runoff. I will do that and would appreciate a few pics. Why didn't I think of that? Would be even better to do it like the hood insert runoff and run a hose off of it to outside the hood? I would have to think of that one a bit though.
    As far as alignment, I didn't know there was a difference, they show fine on my screen? I will check that out though.

  10. #10
    Member Since
    Jun 2004
    Location
    99 Astral Silver VX #1872 + 99 Ironman WIP
    Posts
    10,613
    Thanked: 1
    I'll see if I can find some pics, if not, I'll take a few when the weather warms up a bit.
    As far as running hoses etc...I like to keep things as simple as possible...the drain hoses under the hood insert plug up so often that I don't bother any more, just prop the hood open after a wash until it's dry.

    Viewing horizontally posted pics is most likely a problem on my end...some of us old guys are still using 15" "steam powered" monitors & such...

  11. #11
    Member Since
    Jun 2002
    Location
    2001 Ebony S/C #1304
    Posts
    3,647
    Thanked: 10
    Quote Originally Posted by Marlin View Post
    The hole doesn't have to be perfect, no one will ever see it.

    Oh man, still!

    You ever come over my house, I'm hiding all the bottle openers and can openers (gotta bust some balls here.... I used to do body and paint work).

    Good stuff tho. I am currently running a completely non-functional induction scoop. Looks only since my accident last year replaced my vented hood. Gonna go back to the stock insert as I think both induction and extraction are useless to us (unless we wanna start talking TRUE ram-air for the S/C ).
    Gary Noonan
    '01 S/C VX / '18 Forester XT

  12. #12
    Member Since
    Jul 2005
    Location
    Former 00' Kaiser #0804, 98 White 4Runner SR5
    Posts
    3,761
    Thanked: 0
    what about some louvirs, to relieve exhaust heat?

    and what about changing the intake to a cold air style???

  13. #13
    Member Since
    Dec 2008
    Location
    01, LineX tan/black, 1055
    Posts
    3,380
    Thanked: 0
    Quote Originally Posted by WormGod View Post
    Oh man, still!

    You ever come over my house, I'm hiding all the bottle openers and can openers (gotta bust some balls here.... I used to do body and paint work).

    Good stuff tho. I am currently running a completely non-functional induction scoop. Looks only since my accident last year replaced my vented hood. Gonna go back to the stock insert as I think both induction and extraction are useless to us (unless we wanna start talking TRUE ram-air for the S/C ).
    LOL, just get twist off bottles and pop-top cans and no worries. I did sand the final down a bit, with the trim, it isn't too bad, but certainly not perfect.
    I wish a body shop wouldn't charge 200 dollars for a 1 hour job...then a pro could have done it. But for a first time event, I am ok with the results.
    As far as cold air intake, I don't know, I have been looking, it can't be worse than our existing intake, and the extra room would be nice. That factory airbox is huge.

  14. #14
    Member Since
    Jan 2013
    Location
    2001,custom,#0947
    Posts
    329
    Thanked: 0
    wooow dudes, call the ninja turtles cuz the shredders back with a helping hand from wholvarine hajaha .

    so I was thinking of doing this but then ill have the sup[er charger, sooo what u all think? HOLE??? no HOLE??? keep it facing forward or turn it around like marlins?

    kmeep the same scoop as marlin has or get the bat wing looking lund scoop?


    Quote Originally Posted by WormGod View Post
    Oh man, still!

    You ever come over my house, I'm hiding all the bottle openers and can openers (gotta bust some balls here.... I used to do body and paint work).

    Good stuff tho. I am currently running a completely non-functional induction scoop. Looks only since my accident last year replaced my vented hood. Gonna go back to the stock insert as I think both induction and extraction are useless to us (unless we wanna start talking TRUE ram-air for the S/C ).

  15. #15
    Member Since
    Dec 2008
    Location
    01, LineX tan/black, 1055
    Posts
    3,380
    Thanked: 0
    Wow, this was a blast from the past! That scoop is still there, never changed the tape. That is amazing, been through mud, snow, pressure washed, and so on. Now it is LineXed on forever!


Similar Threads

  1. hood scoop
    By vxfocus in forum VX Modifications...
    Replies: 31
    Last Post: 08/13/2012, 02:44 PM
  2. Hood Scoop
    By Proton_Thang in forum VX Talk...
    Replies: 4
    Last Post: 10/05/2004, 07:19 AM
  3. What do you think of the new hood scoop?
    By Zu4two in forum VX Modifications...
    Replies: 24
    Last Post: 12/10/2003, 04:30 PM
  4. Hood Scoop
    By On Your Left in forum VX Talk...
    Replies: 1
    Last Post: 12/10/2003, 11:55 AM
  5. Hood scoop ??'s
    By Apostle in forum VX Modifications...
    Replies: 1
    Last Post: 11/28/2003, 05:25 PM

Posting Permissions

  • You may not post new threads
  • You may not post replies
  • You may not post attachments
  • You may not edit your posts
  •  
$lv_vb_eventforums_eventdetails