Page 1 of 2 1 2 LastLast
Results 1 to 15 of 29

Thread: NEW Front Bearings and Disc install (pics) - oh what fun...

Hybrid View

Previous Post Previous Post   Next Post Next Post
  1. #1
    Member Since
    Mar 2005
    Location
    01 Ebony - #0379
    Posts
    793
    Thanked: 0

    Talking NEW Front Bearings and Disc install (pics) - oh what fun...

    Well, it was that time by the ODO to replace/repack the bearings. I chose to replace, it was about $200 for new bearings and seals - cheap insurance for something like this. With planetisuzoo's how-to guide (http://www.planetisuzoo.com/articles...earing_Repack), the shop manual and a bit of courage - I took the fun on. yay.

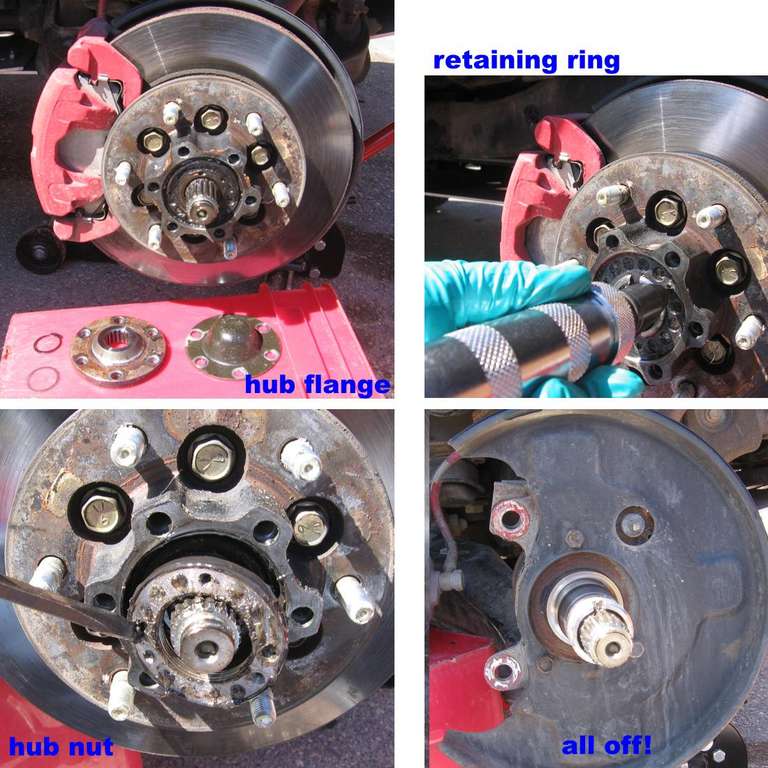
    I'm not after a how-to guide here, but a few pics of the guts to our hub and some of the fun I had along the way.

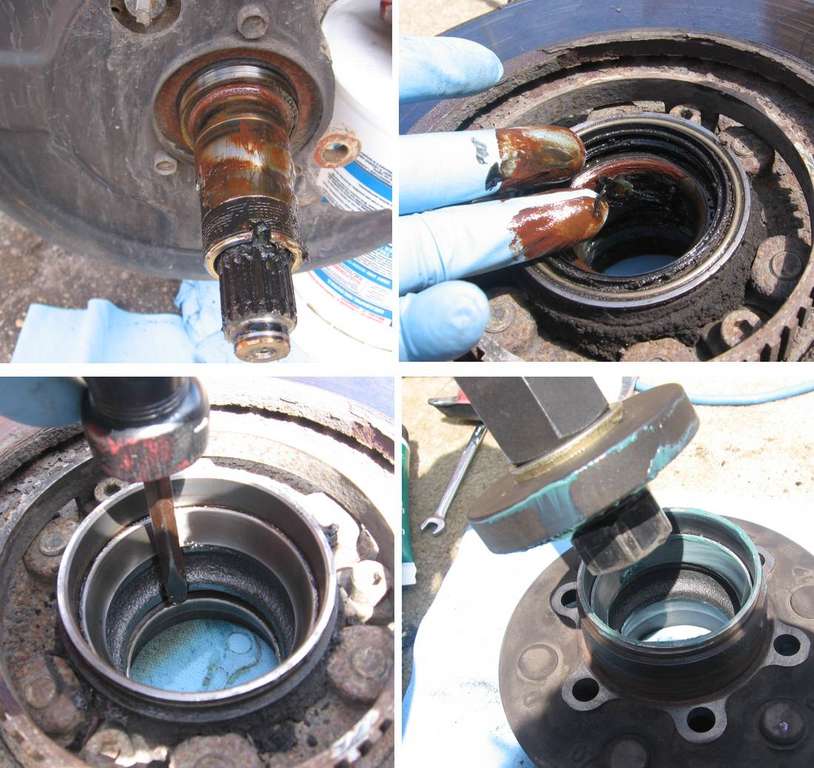
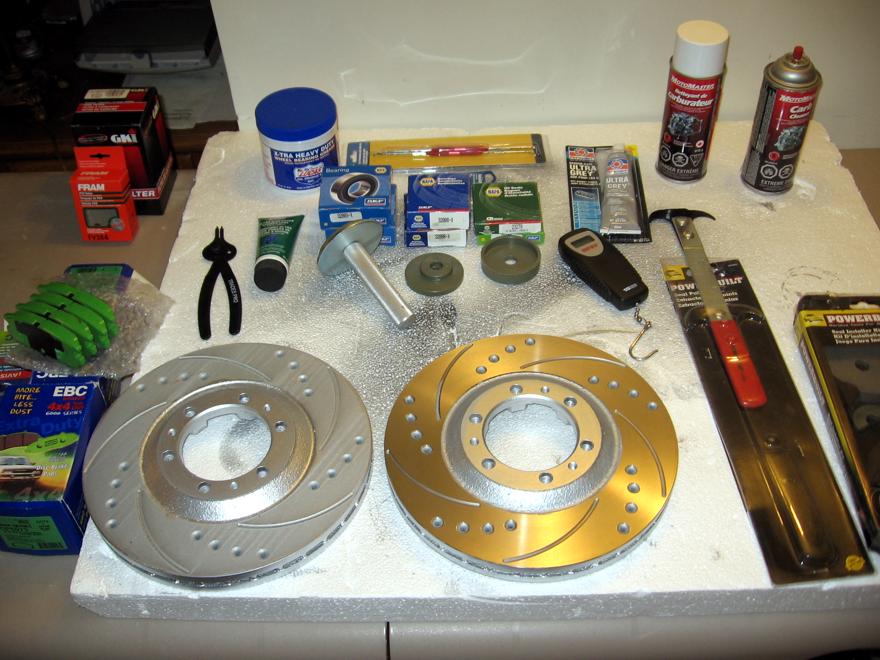
    Since I had to replace the rear rotors, I got front discs too and no better time to replace the front discs than when you're repacking the bearings. The replacement pretty much is the same work load as repacking, instead of playing with getting the old grease out of the bearings you're going to re-use, you are tapping out the raceways and tapping in new ones. I STRONGLY RECOMMEND YOU RENT/BUY A BEARING INSTALL TOOL (metal discs and threaded rod). Tapping in the new raceway in is slow and grueling with a brass draft and hammer , with the bearing tool it only takes 30 seconds to put the new raceways in .

    So here's a few shots of the guts of your hub.


    As everyone kept saying, those philips screws on the retaining ring strip easily. How true! I used one of those impact drivers you hit with a hammer to turn them out - worked like a charm.

    Instead of the hub nut tool, I just used a screw driver and hammer to tap the hub nut on and off. Worked ok for me - it's not on that tight anyhow (or it shouldn't be - else you'll probably be getting 5 MPG if it's super tight .)


    Man, the drivers side grease was pretty discolored rusty red - something got past the oil seal.

    Wasn't too hard to pop out the old raceways if you line up with the notches in the hub. Putting the new ones back was easy as pie with the bearing tool .


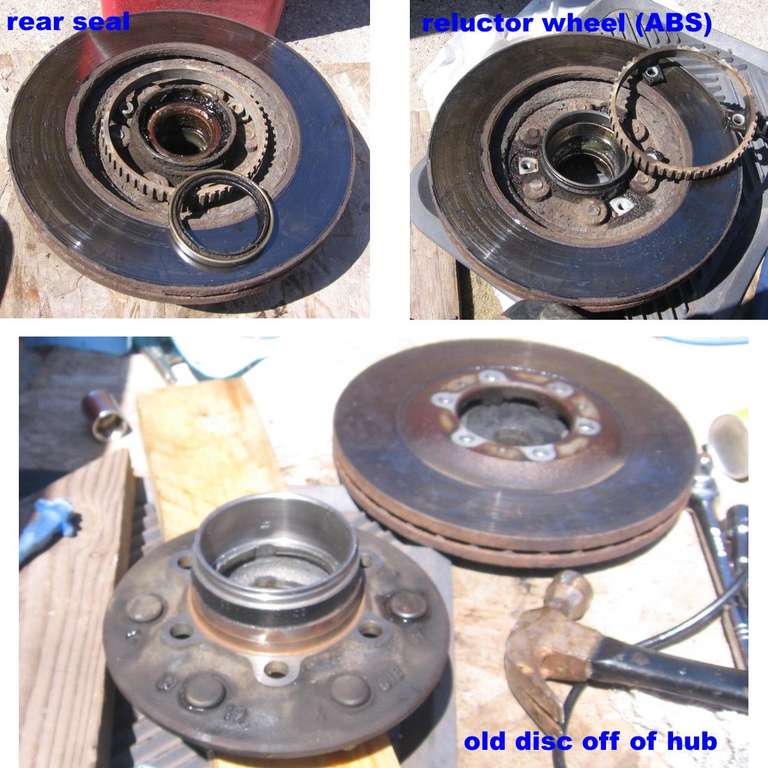
    When replacing the discs, there's a few extra steps; Taking off the ABS reluctor ring (tough 6mm hex bolts!) and popping the hub out.


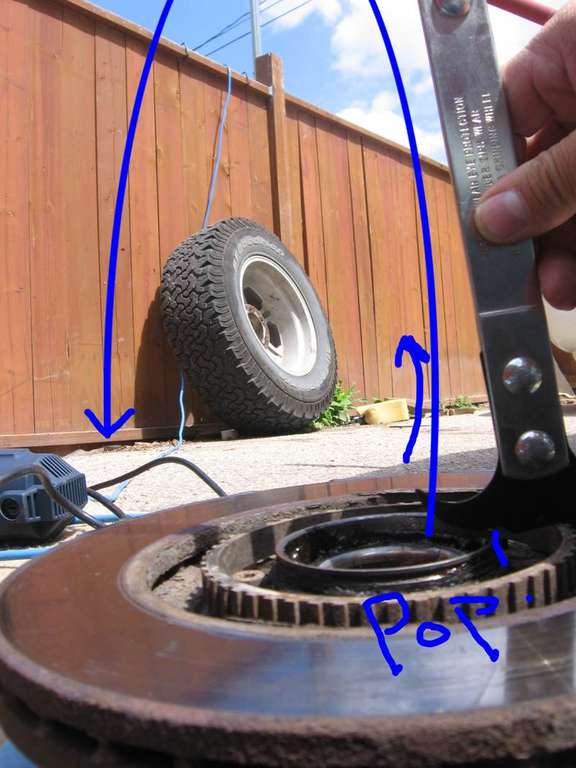
    The hubs come out easily if you support the disc on some wood blocks and use another on the back of the hub. After a few hits, it pops out.


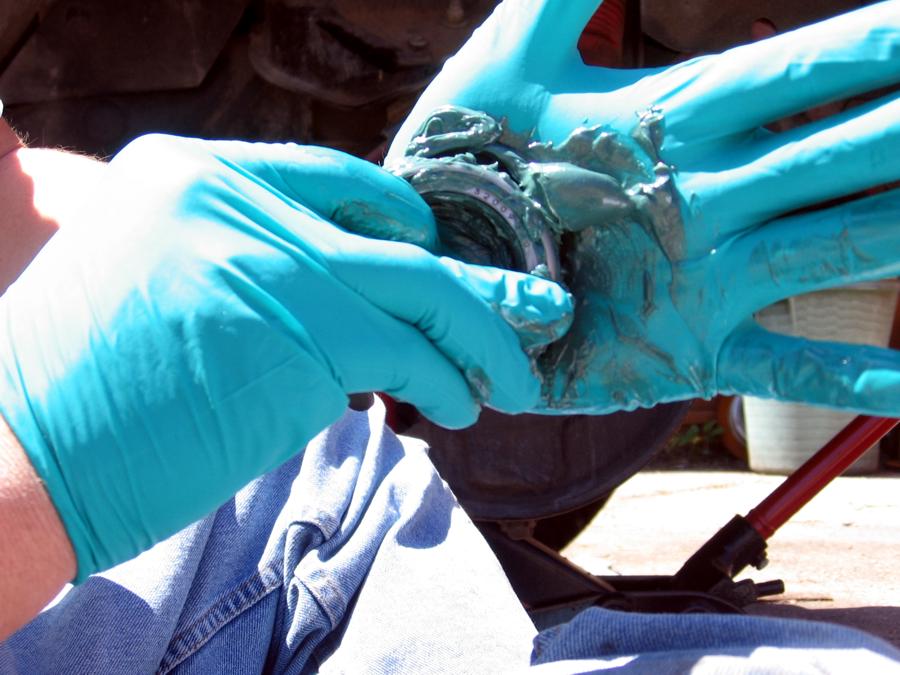
    Since I'm too cheap to buy a packer tool , and I wasn't planning to repack the old bearings, I did it manually - Messy, but fairly simple.


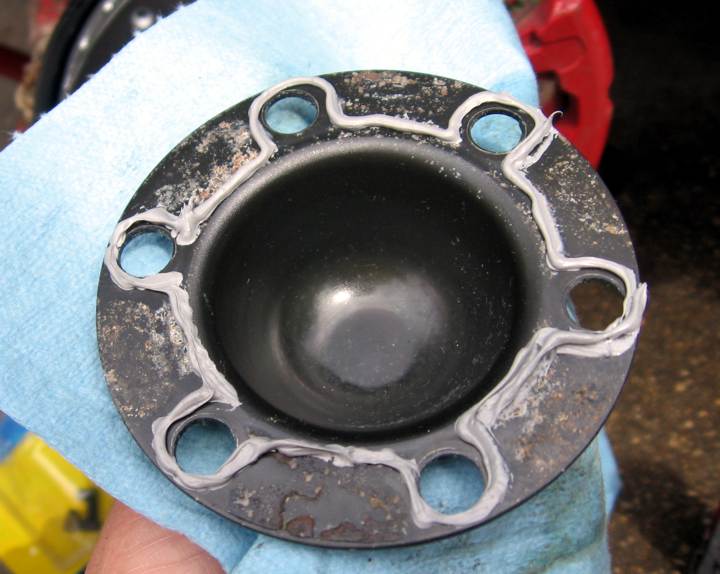
    When putting back on the hub flange and cap, it was recommend to put on a bead of RTV silicone gasket (Room Temperature Vulcanizing). Read instructions, they vary. Bead is on the cap here.


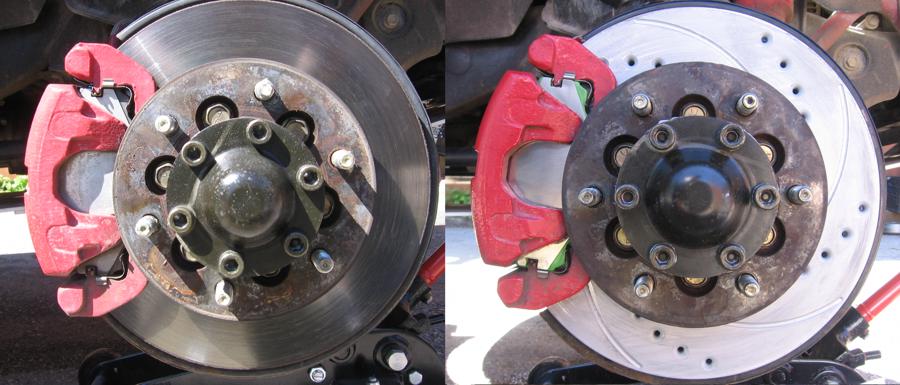
    A before and after with the new SP Performance drilled ans slotted discs and EBC Green Stuff (6000 Series) Pads [Both from Tone].


    I was thinking of making it a sport to see how far the oil seal would fly when you pop it out with the puller tool - Advice: put a rag over it so it won't fly. BETTER ADVICE: USE A SEAL INSTALLER DISC LARGER THAN THE OPENING WHEN INSTALLING THE NEW SEAL, if not it could be tapped into the inner bearing if you tap it in too far.


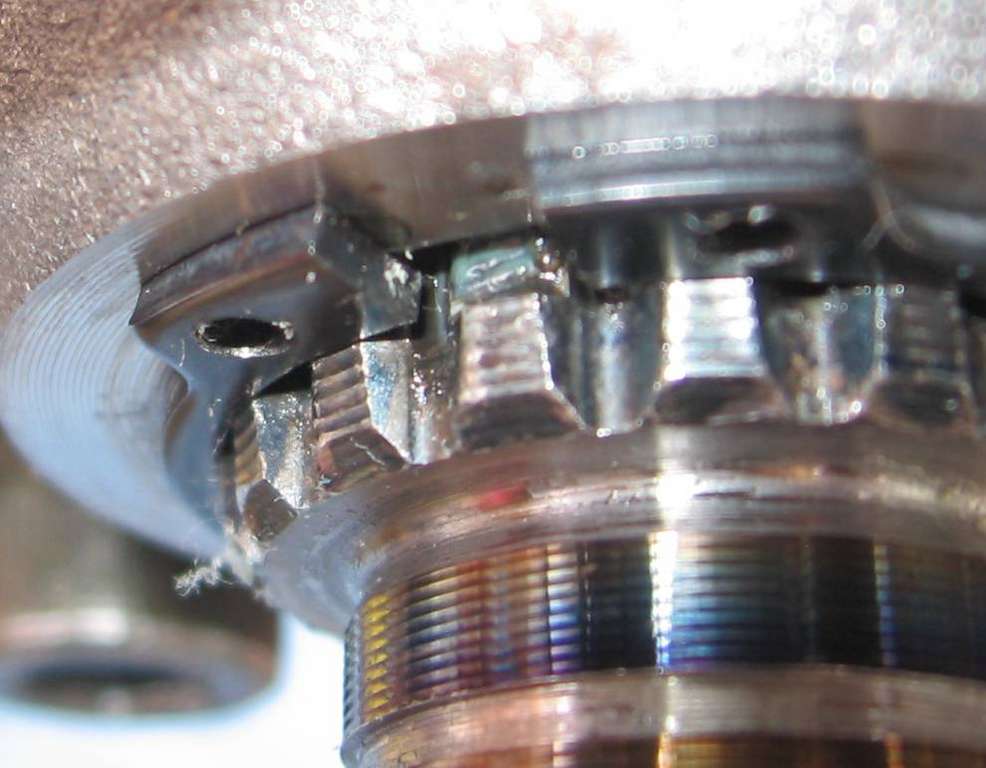
    And finally, my joy with those #$%#'n snap rings on the ends. After putting it all back together and doing all the proper procedures to BOTH sides, the snap rings would not go into the slot along the splines!!!! @$%@#$! It was sooooo close - see if you can make it out in the pic here - it's literally a few hairs off.


    The raceways and bearings are fully seated, the hub nut was loosened and un-loosened over and over (12 times) to compress and spread the grease around. Pre-loading is ~5 - 5.5 lbs both ways.


    It is all one piece from the back face of the hub to the front face of the flange - the new disc shouldn't matter, and I was careful to put a very thin RTV layer on the hub flange. Anyways, I had to shave a few mils off the back of the snap rings and not install the shims to get them to lock into the grooves.

    Now, who is going to freak the $H!^ out of me and tell me that this is an issue??
    Pre-loading is still good and there is no excessive play in the wheel when jacked up and tugged top and bottom. Driving is very smooth when loading (turning) the front tires, etc... All indications are that the hub assembly is tight. The only thing I can think of is the RTV layer is too thick on the hub flange, even though the flange looks tight to the hub. ......

    Oh well, what the worst that could happen

    Plan for about 4-5 hours to repack the bearings if you have talent. If not, it could take you 10 hours. It took me 7.5 hours on the first side with the learning curve and playing with that stupid snap ring. The other side took me 3.5 hours without so much dikin' around. I was longer as I was replacing my discs and pads and rotating tires too.

    Cheers all.

  2. #2
    Member Since
    Dec 2002
    Location
    2001 Ebony 0177
    Posts
    2,120
    Thanked: 0
    That close' and I'd be tempted to use a drift an' BFH... Or littlefh.

  3. #3
    Member Since
    Jun 2004
    Location
    99 Astral Silver VX #1872 + 99 Ironman WIP
    Posts
    10,613
    Thanked: 1

    Thumbs up

    Nice walkthrough on the frnt bearing/rotor procedure.
    Leave it to my wheelin' bud Kenny to turn a mundane task into "Canadian Tiddly Winks."

    BTW, I like the new Av.

  4. #4
    Member Since
    Jul 2006
    Location
    1999. Unique Ironman
    Posts
    405
    Thanked: 0
    really nice work!
    p.s how much were the parts?

  5. #5
    Member Since
    Mar 2005
    Location
    01 Ebony - #0379
    Posts
    793
    Thanked: 0
    Quote Originally Posted by djkymar
    really nice work!
    p.s how much were the parts?
    From NAPA.
    Inner Bearing - $50
    Outer bearing - $40
    Oil seal - $10
    ~$100 x 2.

    Then the consumables and tools....


    about another ~$150.

    So in all, about $350. Probably close to taking it to a mechanic. But why should he get all the fun ????????

  6. #6
    Member Since
    Jun 2002
    Location
    SOLD -- 2001 White Ironman #0797
    Posts
    307
    Thanked: 0
    I've gotten those bearings for less than 20 per.... check prices first. That's a great write up.. I beat the crap out of a new brass punch trying to put in my new races, the tool would have been nice.. that's very correct.

  7. #7
    Member Since
    Mar 2005
    Location
    01 Ebony - #0379
    Posts
    793
    Thanked: 0
    Quote Originally Posted by Ldub
    ...

    BTW, I like the new Av.
    I figured, why should Biju, Bart, and you have all the fun!
    When I saw yours, this is the first one that popped into my head.

  8. #8
    Member Since
    Jun 2004
    Location
    VX Adopted Out. 2005 BMW 325CI & 2006 4Runner.
    Posts
    1,330
    Thanked: 0
    I'm back to Domo-kun for my AV... the butter thing just got old.

    meh.

    Anyways - nice job on the rotors/bearings, etc. Please let me know how you like the green pads. Heard really good things aboot em. If they work out i might havta switch.

    -beej.
    *

    He lingers -- happily -- in a new hybrid state of semi-hormonal adolescence and responsible self-reliance.


    *

  9. #9
    Member Since
    Sep 2005
    Location
    1999 Astral Silver VX #0351
    Posts
    136
    Thanked: 0
    Not sure whether the autozone/o'reilly bearings are made in china or germany. Some one posted that the ones they bought at napa were made in germany. Unless there is a reason to change, one can just repack the original ones that were made in japan and save money.

  10. #10
    Member Since
    Sep 2002
    Location
    '99 Astral #1977
    Posts
    577
    Thanked: 0
    I'm getting ready to tackle this project so I am reviving this thread.
    How many seals are needed? The PlanetIsuzu gives part numbers, but, no quantities. How many did you need to get the job done? When the VX goes down, I need to have everything I need or I'm stuck.
    RichD
    ------------------------------------------------
    ...because vinyl just sounds better!

  11. #11
    Member Since
    Jun 2004
    Location
    99 Astral Silver VX #1872 + 99 Ironman WIP
    Posts
    10,613
    Thanked: 1

    Wrench

    Quote Originally Posted by AnalogVX View Post
    I'm getting ready to tackle this project so I am reviving this thread.
    How many seals are needed? The PlanetIsuzu gives part numbers, but, no quantities. How many did you need to get the job done? When the VX goes down, I need to have everything I need or I'm stuck.
    2 inner grease seals, 1 ea side.
    A little silicone keeps the grease from leaking out of the outer drive flanges & dust cap...

  12. #12
    Member Since
    Dec 2008
    Location
    01, LineX tan/black, 1055
    Posts
    3,380
    Thanked: 0
    Not sure about the front bearings, but I learned some interesting things about the rear bearings this week. The rear bearings were only made by two or three manufacturers. Regardless of the package or company, they come from the same factory. They were made years ago, and often come with the 89-91 collar that retains the rear bearing. Finding the correct collar to hold the bearing requires going through Isuzu. In theory, the collar is reusable, but sometimes breaks on removal(20K press and a torch) or even during install when you press em in. This is why its taking me two weeks to change rear wheel bearings in the RS, which of course are the same in all the trooper/VX since 1991. Lessons learned.....

    I predict future happiness for Americans if they can prevent the government from wasting the labors of the people under the pretense of taking care of them.
    Thomas Jefferson

  13. #13
    Member Since
    Sep 2002
    Location
    '99 Astral #1977
    Posts
    577
    Thanked: 0
    Quote Originally Posted by Ldub View Post
    2 inner grease seals, 1 ea side.
    A little silicone keeps the grease from leaking out of the outer drive flanges & dust cap...
    Thanks bud. I wasn"t sure if the silicone was enough. I hate to get into a repair to find I need more parts. I got the pads, rotors, hardware and lube only to find out there's more to doing the front brakes than the rears. The rear was a cake walk.

  14. #14
    Member Since
    Dec 2007
    Location
    1999, Ebony, VX, 5185
    Posts
    39
    Thanked: 0
    Welp this was a fantastic write up.

    However im in my 10 hour right now, started around 8pm last night. Battled the following: 2 power outages from storms, 2 horsefly attacks prior to said storms, 3 stripped phillips screws, 1 stripped ABS ring screw, Many many overly-lock-tighted screws/bolts, broken rachets, back hurts, too many fumes, no sleep, need beer.

    But solid steady progress thanks to this write up. I was wayyy over due for new disks, pads, and fresh bearing grease. And will feel proud doing this big job myself
    Must ..finish.. ...

  15. #15
    Member Since
    Sep 2002
    Location
    '99 Astral #1977
    Posts
    577
    Thanked: 0
    That was grood write up. I finished mine yesterday. Took me 12 hours. I broke a 1/2" drive breaker bar and a ratchet trying to break loose caliper bolts. I even used a propane torch to help loosen all the bolts. It definatley would have been easier with power tools!

    Tapping the little phillips screws with a hammer to help remove them without stripping helped alot, but still not without casulties. A good way to remove a stripped screw like that is to tap a Torx bit into the head and work it out.

    It was a much bigger job than I imagined.

Similar Threads

  1. Replies: 8
    Last Post: 12/18/2012, 09:01 PM
  2. Front Wheel Bearings
    By crager34 in forum VX Talk...
    Replies: 3
    Last Post: 06/02/2012, 05:51 PM
  3. Had my front bearings repacked today
    By Solitude in forum VX Talk...
    Replies: 24
    Last Post: 04/29/2008, 09:00 AM
  4. Repack Front Wheel Bearings
    By DK in forum VX Troubleshooting...
    Replies: 15
    Last Post: 03/06/2008, 01:20 PM
  5. Cost of repacking front bearings?
    By Dare2Dream in forum VX Talk...
    Replies: 7
    Last Post: 10/28/2005, 03:55 PM

Posting Permissions

  • You may not post new threads
  • You may not post replies
  • You may not post attachments
  • You may not edit your posts
  •  
$lv_vb_eventforums_eventdetails