Page 2 of 6 FirstFirst 1 2 3 4 5 6 LastLast
Results 16 to 30 of 86

Thread: question to those with Alpine SC

  1. #16
    my kit didnt have it either and im still waiting for it (4 months and counting). i can tell you what i am doing in the mean time. im assuming you have the regular throttle bracket that goes on the back of the s/c. i went to auto zone looking for a flat metal bracket of some sorts. i ended up with a "super chrome alternator mounting bracket" or whatever. it was like $4. it was thick enough. so i took it home and beat it flat. it already had holes in it so that was a plus. the cables have a part with no threads that is thinner than the rest. you need to chisel out just enough to where the this part of the cable can slide into the bracket. that way, once you slide it back it cant fall off b/c the threads will be thicker than what you chiseled out. the washers are for spacing as the cc cable must be closer the the throttle body. i would take a picture for you but im not in the country. so i give my awsome ms paint rendition. alpine told me the guy that makes them isnt there anymore. but they would send one as soon as they made one. this seems to work fine. and you can make one with a spare peice of metal, a drill and a hacksaw 
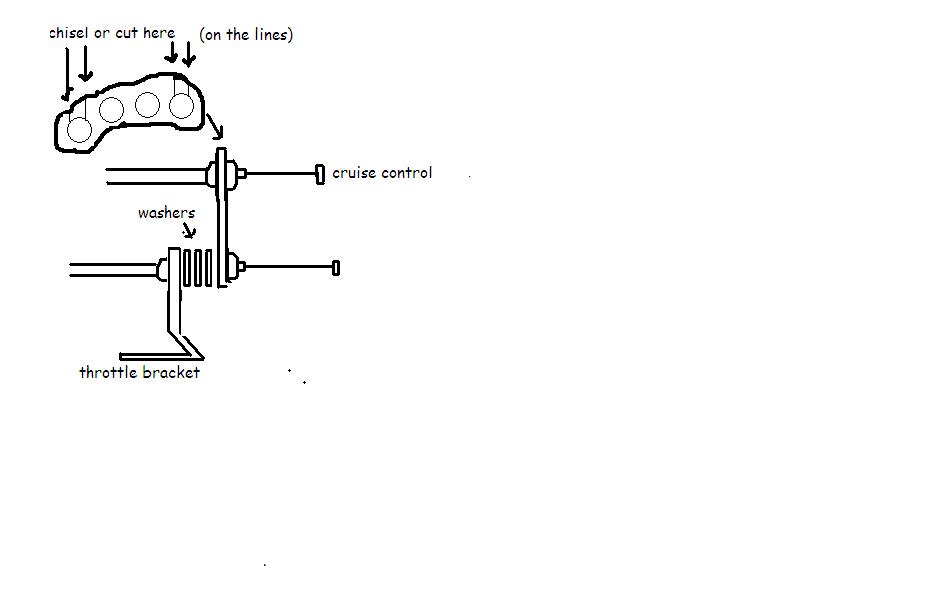
just get the Throttle body on first then kind of eye ball it to line up where the cc cable should mount do have a straight shot at it.


  2. #17
    Member Since
    Jun 2002
    Location
    2001 Ebony S/C #1304
    Posts
    3,647
    Thanked: 10
    Oh man, dont say that. When it !@#$ing rains it pours when it comes to my luck. I sent an email to Alpine concerning the bracket and the cable since I was at work but havent heard back yet, so I guess I am gonna have to step out of work and make a call tomorrow instead. I hate to have to fab something on my own.

    I have the original accel bracket so I am just gonna have to go with that for now. I cant afford to have the VX camped out in the garage all damned spring waiting for a part that may never come. I guess the joke is on me for waiting 3 years to install it.

    AAARRRGGHHH!
    Gary Noonan
    '01 S/C VX / '18 Forester XT

  3. #18
    Member Since
    Jun 2002
    Location
    2000 Dragon Green VX 0485
    Posts
    379
    Thanked: 0

    Green Dragon First VX supercharged.

    As The owner of the first VX ever supercharged( Factory installed), I can tell you of the many issues resulting in noise & eventual failure of nose cones rear bearings etc.

    On 5/5/05 I decided I had done all I could do in trying to make a silk purse out of a sows ear & sent the SC out for overhaul to

    www.superchargerTech.com

    Supercharger Technologies
    26988 SE Hwy 19
    unit 47 Old Town Fl. 32680

    352 542 0147

    SC came with a 2 year warranty at a total cost of $490 ( exchange)

    Result was awesome everthing replaced, nose cone, bearings etc every bearing including rear housing bearings replaced. SC is after two years still as smooth as butter with no noise or any other issues.

    Bob F
    Neither ordinary or extraordinary, just indefatigable.

    2000 VX Green Dragon- Chick Demagnitizer-Supercharger-Injen Intake- Cold air box-K&N- Power Vault SS Exhaust-265-75-16 BFG MT kms-On Board CO2- Custom Boulder Bars- Custom Skid plates- PIAA 520 Fog Lites-3inch lift with OME 912 Springs-LINE X Bedliner on Cladding & Hood Insert-ARB Front Lockers & Custom Bull Bar. Vintage Offenhauser Hood scoop Thule Rack. XM Radio-Custom Storage Box-First VX to surmount the RUBICON.Thanks Sierra Stompers

  4. #19
    Member Since
    Jun 2002
    Location
    1999, Ebony, VX, #1679
    Posts
    8,422
    Thanked: 3
    Bob, glad to see you still bopping around here!
    Billy Oliver
    15xIronman
    My Sponsors:
    Accelerate3Coaching
    TriSports.com (PM me for 1 time use 20% off code)

  5. #20
    Member Since
    Jun 2002
    Location
    2001 Ebony S/C #1304
    Posts
    3,647
    Thanked: 10
    Hey hey, look, it's Dragon Bob! Good to see ya lurking around. Hope all is well.

    Found I had to order a new throttle body gasket last night. The existing one was so unusable, it was hardly even visible. Something got the better of it. So, a new one on order from isuzuparts.com (they love me now.... I think I keep them in business). In the meantime, while I wait for it, I guess I will just clean and polish up everything from the throttle body to the EGR. The EGR isnt in the best of shape either, but, if it aint broke, dont fix it. I think my VX is clearly allergic to winter salts here.

    Slow progress is still progress. About 2 hours a night in the garage. I dont recall my previous S/C installs having so much damned hosing, heh. Of course, those were not fuel injected vehicles though.

    Question about polishing: The fuel rails and the EGR mount.... those who polished these, any advice?

  6. #21
    Member Since
    Jun 2004
    Location
    99 Astral Silver VX #1872 + 99 Ironman WIP
    Posts
    10,613
    Thanked: 1

    Arrow

    Quote Originally Posted by WormGod
    Question about polishing: The fuel rails and the EGR mount.... those who polished these, any advice?
    I used some Flitz metal polish, a cotton rag, & lots of elbow grease...a buffing wheel on a bench grinder would have eliminated the elbow grease thing.
    Also, plug all orfices in the fuel rails with scraps of rag to prevent any metal polish residue from entering the rail.

    Another tip to make your install easier...cut some "U" shaped shims out of sheet aluminium (available @ most hardware/hobby stores) about an inch square, with a 1/4" slot in the middle to aid in alignment of the fuel rails.
    On mine, the rails were slightly mis-aligned when tightened onto the existing (on the Alpine manifold) mounts causing some binding issues with the injectors. When the rails are tightened to the mounting lugs, you should still be able to rotate the injectors back & forth with moderate hand pressure.

    Use emery cloth to slightly enlarge the beveled edge where the injectors go into the fuel rail & ample silicone grease on the upper & lower injector O-rings to keep from tearing O rings, as clearances are VERY tight.

    Good Luck !

  7. #22
    Member Since
    Jun 2002
    Location
    2001 Ebony S/C #1304
    Posts
    3,647
    Thanked: 10
    I actually had no issues installing the injectors into the rails. Very mild lubing of the plenum ports and very minor lubing of the fuel rail ports. Then some slow but constant twisting of the injectors as you apply pressure to put them in the plenum. Getting them in the fuel rails was alittle trickier but not so bad really. I laid the rail over the injectors and lined up the ports to them. Applying a little pressure to the rail while slowly twisting the injectors a little at a time and they worked their way into the rail. The rail mounted up right to the plenum with a perfect fit.

    I assumed I was gonna have trouble getting them in since i played hell getting them out of the OEM fuel rail, but I was pleasantly surprised that it was the opposite. In all, the o-rings were still in great shape (only a couple years old) so I didnt have to use any of my new ones. Good to have regardless.

    My only issue this weekend was getting the nut off of the crank pulley. I hunted all over for a crank holder. No shops nor any of my tech friends had access to one (found one that fit various Fords, but no luck on my pulley). So, I ended up using the serpentine belt. I did the old wrap and fold of the belt around the pully and cranked the nut in the opposite direction. Worked like a charm (with some shop gloves that is.... hard on the hands). It's a risky tactic if you want to re-use your belt, so I suggest only doing this if you are replacing it. In my case, I was replacing all belts and gaskets so I had nothing to lose.

    Looking over some stuff at quitting time last night, I was checking out the wiring. Does anyone recall what harnesses, if any, they had to splice and lengthen? Looks like there is gonna have to be some extension for the wiring to reach the new throttle body location.
    Last edited by WormGod : 04/02/2007 at 09:39 AM

  8. #23
    Member Since
    Jun 2004
    Location
    99 Astral Silver VX #1872 + 99 Ironman WIP
    Posts
    10,613
    Thanked: 1
    MAF & IAT

  9. #24
    Member Since
    Jun 2002
    Location
    01,Mica Red aka Firefox,VX,1426
    Posts
    493
    Thanked: 0
    Quote Originally Posted by Green Dragon
    As The owner of the first VX ever supercharged( Factory installed), I can tell you of the many issues resulting in noise & eventual failure of nose cones rear bearings etc.

    On 5/5/05 I decided I had done all I could do in trying to make a silk purse out of a sows ear & sent the SC out for overhaul to

    www.superchargerTech.com

    Supercharger Technologies
    26988 SE Hwy 19
    unit 47 Old Town Fl. 32680

    352 542 0147

    SC came with a 2 year warranty at a total cost of $490 ( exchange)

    Result was awesome everthing replaced, nose cone, bearings etc every bearing including rear housing bearings replaced. SC is after two years still as smooth as butter with no noise or any other issues.

    Bob F
    Bob...what was the length of the turn around for the overhaul?
    Scott

  10. #25
    Member Since
    Jun 2002
    Location
    01,Mica Red aka Firefox,VX,1426
    Posts
    493
    Thanked: 0
    Quote Originally Posted by WormGod
    Oh man, dont say that. When it !@#$ing rains it pours when it comes to my luck. I sent an email to Alpine concerning the bracket and the cable since I was at work but havent heard back yet, so I guess I am gonna have to step out of work and make a call tomorrow instead. I hate to have to fab something on my own.

    I have the original accel bracket so I am just gonna have to go with that for now. I cant afford to have the VX camped out in the garage all damned spring waiting for a part that may never come. I guess the joke is on me for waiting 3 years to install it.

    AAARRRGGHHH!
    Gary, from experience email rarely gets answered at Alpine. Call them directly. I've been talking to a fellow named John who is "trying" to be helpful.

  11. #26
    Member Since
    Jun 2002
    Location
    2001 Ebony S/C #1304
    Posts
    3,647
    Thanked: 10
    Me again, day #10. Progressing slowly but surely, a little at a time. Was actually having fun until last night when I finally found myself with hammer in hand. Getting the plenum to seat correctly with the EGR mount and the EGR exhuast piping proved to turn into a 1 hour nightmare. Something simply didnt mesh up properly so I had to get a little rough in some areas with force. It's all in place now, but I am hoping that I didnt harm the EGR mount in the process. There were mahy loud and lude words being heard from in my garage last night.

    Anyways, just about everything is on place. Tested my fule lines and after one extreme spray from the rear fuel rail by the EGR (DAMJN! always, with the EGR.... what a cursed area!), I tapped all fuel leaks and am on business. The garage smells grand with 93 octane hovering about. Belts in place, spark and fuel wire harnesses connected, plenum tightened down. Ready to roll some more.

    My question is this however.... I may be missing something, but the original manifold housed a bracket enclosing the fuel pressure regulator. There is no mention of this on the S/C. It has a wire harness connection and 2 hose ports, both of which connect to the rear of the original manifold. On the S/C, the fuel pressure regulator connects to the small brass hose port on the rear of the plenum, just behind the fuel pressure regulator housing, if I am correct. But this leaves out the original bracket, which has 2 hose ports and a wire harness. Where does this fit into the equation?

    Also, wire harness extending.... never been great at wire work, but I get by. Any advice on what wire gauge is best? I want to get it right the first time, so I plan to solder and shrink tube before wrapping it up.


  12. #27
    Member Since
    Jun 2002
    Location
    2001 Ebony S/C #1304
    Posts
    3,647
    Thanked: 10
    Reiterating a question from my last post concerning the fuel pressure regulator, but with pictures this time to try to get my point made more clear. Basically, there is a protection bracket (so the workshop manual calls it) surrounding the regulator that houses a wire harness connection and 2 small ports.


    (2 and 3 below point to the 2 ports on the protection bracket w/ wire harness port)


    Besides getting the right length hosing to finish the install and figuring out where this bracket and these ports fit into the S/C equation, these are really the only things holding me back from finishing. Any out there that installed their own S/Cs got the answer I am looking for?

    S/C installs were clearly more simplified on PRE fuel injected cars.

  13. #28
    Member Since
    Jun 2004
    Location
    99 Astral Silver VX #1872 + 99 Ironman WIP
    Posts
    10,613
    Thanked: 1

    Arrow

    IIRC, & it's been a while...I removed the bracket from the vac. controlled mechanism & put a piece of vac. hose between #2 & 3 in pic 7. Then just zip tie it out of the way.
    I think those lines had something to do with the small cannister over by the cruise control/ ABS module which is abandoned also.(not the ABS, but the small cannister) I put a piece of vac hose between the two ports on the cannister to keep things clean in case I ever want to go back to the NA setup.(not likely )

    I have a diagram of the vac hose routing if you need it.

    Gotta love the incredibly vague install instructions from Alpine.

  14. #29
    Member Since
    Jun 2002
    Location
    2001 Ebony S/C #1304
    Posts
    3,647
    Thanked: 10
    Quote Originally Posted by Ldub
    IIRC, & it's been a while...I removed the bracket from the vac. controlled mechanism & put a piece of vac. hose between #2 & 3 in pic 7. Then just zip tie it out of the way.
    I think those lines had something to do with the small cannister over by the cruise control/ ABS module which is abandoned also.(not the ABS, but the small cannister) I put a piece of vac hose between the two ports on the cannister to keep things clean in case I ever want to go back to the NA setup.(not likely )

    I have a diagram of the vac hose routing if you need it.

    Gotta love the incredibly vague install instructions from Alpine.
    Oh dear god that diagram would be extremely appreciated!! I understand the majority of the hvac hosing, but the smaller lines have me a little confused. Especially things like that which you mentioned that were "left out" so to speak. That diagram would rock Ldub. I hope to document ALL of this information from my build into the S/C install thread that I started for any future S/C installers or repairers so they dont have to ask as many questions as I am. God knows, if you do a search on here about S/C issues, it turns up more threads than eadlight gaskets and power window issues, haha.

    Thanks Ldud!

  15. #30
    Member Since
    Jun 2004
    Location
    99 Astral Silver VX #1872 + 99 Ironman WIP
    Posts
    10,613
    Thanked: 1

    Arrow

    I'm not sure if this will be of any use, it's a little more vague than I remembered (big surprise, It's from Alpine ), but it helped me get it right.


Similar Threads

  1. Alpine S/C install PDF
    By Ldub in forum VX Modifications...
    Replies: 2
    Last Post: 04/06/2010, 01:12 AM
  2. Alpine Supercharger Manual Available
    By BeeVenom in forum VX Modifications...
    Replies: 10
    Last Post: 07/19/2009, 10:34 AM
  3. Alpine S/C users read this!!!!
    By bigpoppax2 in forum VX Modifications...
    Replies: 19
    Last Post: 07/15/2008, 11:16 AM
  4. 411 on Tone & Alpine
    By xdfarrx in forum VX Talk...
    Replies: 1
    Last Post: 03/06/2005, 05:12 PM
  5. Alpine - John Conchie
    By UtahVXer in forum VX Talk...
    Replies: 17
    Last Post: 09/03/2004, 05:50 AM

Posting Permissions

  • You may not post new threads
  • You may not post replies
  • You may not post attachments
  • You may not edit your posts
  •  
$lv_vb_eventforums_eventdetails